
Two Notes TNCAPTOR4
Instrukcja obsługi Two Notes Torpedo Captor 4
Reactive Load Box, Attenuator, DI, and Speaker Simulator
1. Wprowadzenie
The Two Notes Torpedo Captor 4 is a versatile device designed for guitar and bass players using tube amplifiers. It functions as a reactive load box, an attenuator, a direct injection (DI) box, and a speaker simulator. This unit allows you to safely connect your tube amplifier without a speaker cabinet, reduce your amplifier's volume for practice or recording, and send a high-quality, cabinet-simulated signal directly to a mixing console or audio interface.
This manual provides essential information for the safe and effective operation of your Torpedo Captor 4. Please read it thoroughly before use.
2. Informacje dotyczące bezpieczeństwa
WARNING: Risk of Electric Shock. Do not open the enclosure. Refer servicing to qualified personnel only.
- Always connect your amplifier's speaker output to a suitable load. The Torpedo Captor 4 provides a 4-ohm reactive load. Ensure your amplifier's output impedance matches the Captor's impedance.
- Nie ustawiaj swojego amp master volume to maximum when connected to the Captor 4, especially when using the attenuator, to avoid possible damage to your amplifier or the Captor.
- This device is designed for tube amplifiers up to 100 Watts RMS. Exceeding this power rating can cause damage.
- Ensure proper ventilation. Do not block ventilation slots.
- Trzymaj urządzenie z dala od wody, wilgoci i ekstremalnych temperatur.
- Use only the specified power supply (9 to 24VDC, 5mA) for the DI section if phantom power is not available.
3. Koniec produktuview
The Torpedo Captor 4 features a robust black metal enclosure with clearly labeled inputs, outputs, and controls.

Rycina 3.1: Przód View of the Torpedo Captor 4. This image shows the top and front of the black rectangular unit, displaying the 'Two Notes Audio Engineering' logo and 'Torpedo Captor 4' branding. It also indicates its functions: '100W 4Ω LOADBOX', 'ATTENUATOR', 'SPEAKERSIM', and 'DI'.
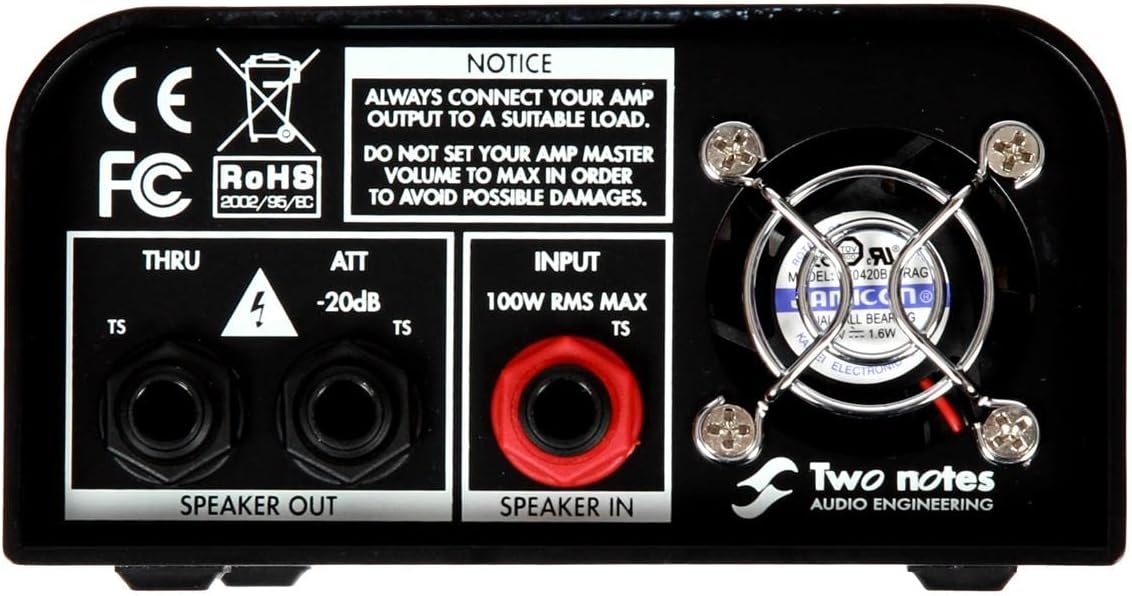
Rysunek 3.2: Połączenia na panelu tylnym. This image displays the rear panel of the Torpedo Captor 4, featuring the 'SPEAKER IN' (100W RMS MAX TS) and 'SPEAKER OUT' (THRU and ATT -20dB TS) jacks. A prominent notice warns users to always connect their amp output to a suitable load and not to set the amp master volume to max. A cooling fan is also visible.

Figure 3.3: Front Panel Controls and DI Output. This image shows the front panel of the Torpedo Captor 4, highlighting the 'LINE (DRY)' TRS output, 'DI' XLR output with 'GND LIFT' switch, 'OUT LEVEL' knob, 'PHASE' switch (0°/180°), and 'SPKR SIM' switch (OFF/GTR/BASS). A 48V Phantom Power indicator and a DC input for 9 to 24VDC are also visible.
Główne cechy:
- Reactive Load Box: Provides a stable 4-ohm load for your tube amplifier, allowing it to operate safely without a speaker cabinet.
- Tłumik: Reduces your amplifier's output by -20dB, enabling you to achieve cranked-amp tones at lower, more manageable volumes.
- Direct Box (DI): Offers a balanced XLR output for sending your amplifier's signal directly to a mixer or audio interface.
- Symulator głośnika: Built-in analog speaker simulation (Guitar and Bass modes) for the DI output, eliminating the need for microphone placement.
- Wyjście liniowe: An unbalanced 1/4" TRS line output provides a dry signal for re-amplub dalszemu przetwarzaniu.
- Winda naziemna: A switch on the DI output helps eliminate hum and ground loops.
- Zmiana fazy: Allows for phase inversion (0° or 180°) on the DI output.
4. Konfiguracja
Before connecting, ensure your ampUrządzenie jest wyłączone i odłączone od źródła zasilania.
4.1 Basic Connection (Load Box/Attenuator Mode)
- Connect your tube amplifier's speaker output (ensure it's a 4-ohm output if your amp has multiple options) to the GŁOŚNIK W (TS 1/4") jack on the rear panel of the Torpedo Captor 4. Use a high-quality speaker cable.
- If you wish to use an external speaker cabinet with attenuation, connect the SPEAKER OUT ATT -20dB (TS 1/4") jack to your speaker cabinet. This will reduce the volume by 20dB.
- If you wish to use an external speaker cabinet without attenuation (pass-through), connect the SPEAKER OUT THRU (TS 1/4") jack to your speaker cabinet. The Captor will still provide a load to the amp, but the signal passes through to the speaker at full volume.
- For silent recording or practice, you do not need to connect anything to the SPEAKER OUT jacks. The Captor 4 provides the necessary load.
4.2 DI Output Connection
- Połącz DI (XLR) output to your mixing console, audio interface, or PA system using a standard XLR cable.
- If your mixing console or audio interface provides 48V phantom power, the DI section of the Captor 4 will be powered automatically. Otherwise, connect a 9 to 24VDC power supply (not included) to the DC input jack on the front panel.
4.3 Line Output Connection
- Połącz LINE (DRY) (TRS 1/4") output to an input on your audio interface or other processing unit for a dry, unprocessed signal. This output is unbalanced.

Figure 4.1: Torpedo Captor 4 in a Studio Setup (Side View). This image shows the Torpedo Captor 4 placed on top of a guitar amplifier in a studio environment. Cables are connected to the rear panel, illustrating a typical setup for recording or attenuated playing. A studio console is visible in the background.

Figure 4.2: Torpedo Captor 4 in a Studio Setup (Front View). This image provides another perspective of the Torpedo Captor 4 connected to an amplifier in a studio. The front panel controls are visible, along with the connected cables, demonstrating the unit's compact size and integration into a professional audio setup.
5. Instrukcja obsługi
5.1 Using the Attenuator
Kiedy już twoje amplifier jest podłączony do GŁOŚNIK W and your speaker cabinet to the SPEAKER OUT ATT -20dB, you can turn on your amplifier. The Captor 4 will automatically reduce the volume by 20dB, allowing you to drive your amp harder for desired tone without excessive volume.
5.2 Using the DI Output with Speaker Simulation
- Ensure the DI output is connected to your mixer/interface and powered (phantom power or DC adapter).
- Użyj SPKR SIM switch to select the desired speaker simulation:
- OFF: No speaker simulation applied.
- GTR: Optimized for electric guitar tones.
- GITARA BASOWA: Optimized for bass guitar tones.
- Dostosuj POZIOM WYJŚCIOWY knob to control the output volume of the DI signal. Start with a low level and gradually increase to avoid clipping.
- If you experience hum or buzzing, try flipping the Podnoszenie uziemienia przełącznik.
- Ten FAZA switch (0°/180°) allows you to invert the phase of the DI signal, which can be useful for correcting phase issues when combining with other signals (e.g., a miked cabinet).
5.3 Using the Line Output
Ten LINE (DRY) output provides a direct, unprocessed signal from your amplifier's output, after the load box. This is ideal for re-amping, where you record the dry signal and then send it back through an amplifier or software simulations later. The output level is controlled by the POZIOM WYJŚCIOWY pokrętło.
6. Konserwacja
- Czyszczenie: Do czyszczenia zewnętrznej części urządzenia należy używać miękkiej, suchej ściereczki. Nie należy używać środków czyszczących o właściwościach ściernych ani rozpuszczalników.
- Wentylacja: Ensure the ventilation slots are clear of dust and debris to prevent overheating. Periodically check and clean if necessary.
- Składowanie: Store the unit in a dry, cool place away from direct sunlight and extreme temperatures when not in use.
- Kontrola kabla: Regularnie sprawdzaj wszystkie kable pod kątem oznak zużycia lub uszkodzeń. Uszkodzone kable należy natychmiast wymienić.
7. Rozwiązywanie Problemów
| Problem | Możliwa przyczyna | Rozwiązanie |
|---|---|---|
| No sound from DI output. | No phantom power or DC adapter connected; incorrect cable; OUT LEVEL too low. | Ensure 48V phantom power is active on your mixer/interface or connect a 9-24VDC power supply. Check XLR cable connection. Increase OUT LEVEL knob. |
| Hum or buzzing from DI output. | Pętla uziemienia. | Zaangażuj się Podnoszenie uziemienia switch on the front panel. Ensure all equipment is properly grounded. |
| Distorted sound from DI output. | OUT LEVEL too high; amplifier output too high. | Zmniejszyć POZIOM WYJŚCIOWY knob. Ensure your amplifier's output is not excessively high, causing clipping at the Captor's input. |
| Amplifier sounds bad or damaged. | Incorrect impedance match; no load connected; amplifier power exceeds 100W. | Upewnij się, że amplifier's speaker output impedance (e.g., 4 ohms) matches the Captor 4. Always connect the GŁOŚNIK W. Do not use with amplifiers exceeding 100 Watts RMS. |
8. Specyfikacje
- Model: Torpedo Captor 4
- Impedancja obciążenia: 4 omy
- Maksymalny Amplifier Moc: 100 W RMS
- Tłumik: -20dB
- Wejścia: 1 x 1/4" TS Speaker In
- Wyjścia: 1 x 1/4" TS Speaker Out (Thru), 1 x 1/4" TS Speaker Out (-20dB Attenuation), 1 x XLR DI Out, 1 x 1/4" TRS Line Out (Dry)
- DI Output Power: 48V Phantom Power or 9-24VDC (5mA)
- Speaker Simulation: Analog (Guitar, Bass)
- Zmiana fazy: 0°/180°
- Winda naziemna: Tak
- Wymiary: 8.85 x 6.6 x 3.95 cala (22.5 x 16.8 x 10 cm)
- Waga: 2.95 funtów (1.34 kg)
- Kolor: Czarny
9. Gwarancja i wsparcie
For warranty information and technical support, please refer to the official Two Notes Audio Engineering webOdwiedź witrynę lub skontaktuj się z autoryzowanym dealerem. Zachowaj dowód zakupu na wypadek roszczeń gwarancyjnych.
Zasoby internetowe: Visit the Two Notes website for the latest firmware updates, software, and additional documentation.
Ask a question about this manual
Ask about setup, troubleshooting, compatibility, parts, safety, or missing instructions. Manuals+ will review the question and use this page’s manual context to help answer it.