
1. Wprowadzenie
Dziękujemy za zakupasing the Caliber RMD 068-2 Car Radio USB/SD Player. This manual provides detailed instructions for the installation, operation, and maintenance of your new car radio. Please read this manual thoroughly before using the product to ensure proper functionality and safety. Keep this manual for future reference.
2. Informacje dotyczące bezpieczeństwa
- Instalacja: Ensure the unit is installed by a qualified technician to prevent damage to the vehicle's electrical system. Incorrect wiring can cause fire or electrical shock.
- Zasilanie: Podłączać urządzenie wyłącznie do akumulatora samochodowego 12 V prądu stałego z ujemnym biegunem uziemienia.
- Bezpieczniki: Always replace fuses with new ones of the specified rating. Using an incorrect fuse can cause damage to the unit or vehicle.
- Poziom głośności: Do not operate the unit at excessively high volume levels, as this may impair your ability to hear external traffic sounds and could be dangerous.
- Czyszczenie: Do czyszczenia używaj miękkiej, suchej ściereczki. Nie używaj ściernych środków czyszczących ani rozpuszczalników.
- Wilgoć: Nie wystawiaj urządzenia na działanie wilgoci lub wody.
3. Zawartość opakowania
Sprawdź, czy wszystkie elementy są obecne:
- Caliber RMD 068-2 Car Radio Unit
- Zdejmowany panel przedni
- Wiązka przewodów ISO
- Rama montażowa
- Klucze do demontażu (2 szt.)
- Instrukcja obsługi (ten dokument)
4. Koniec produktuview
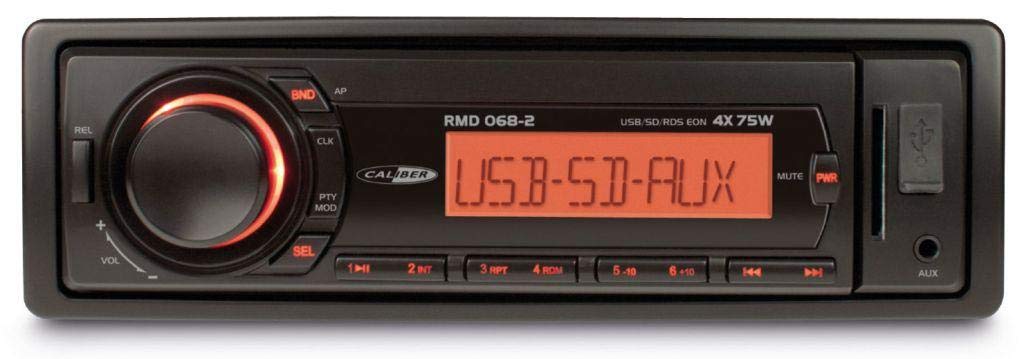
Rycina 1: Przód view of the Caliber RMD 068-2 Car Radio. This image shows the main unit with its detachable front panel, including the display, control buttons, USB port, and SD card slot.
4.1 Elementy sterujące na panelu przednim
- Przycisk ZASILANIE/TRYB: Press to turn on/off. Short press to switch between Radio, USB, SD, AUX modes.
- Gałka GŁOŚNOŚCI: Rotate to adjust volume. Press to access audio settings (Bass, Treble, Balance, Fader).
- POKAZ: Shows current time, radio frequency, track information, etc.
- Port USB: Podłącz dyski flash USB w celu odtwarzania multimediów.
- Gniazdo karty SD: Włóż kartę SD, aby odtwarzać multimedia.
- Wejście AUX (gniazdo 3.5 mm): Podłącz zewnętrzne urządzenia audio.
- Przycisk BAND/AMS: In radio mode, press to select radio band (FM1, FM2, FM3). Long press for Automatic Memory Store.
- Przyciski PRESET (1-6): Store and recall radio stations. In USB/SD mode, use for direct track selection.
- Przycisk ODTWARZANIA/PAUZY: Odtwórz lub wstrzymaj odtwarzanie multimediów.
- FORWARD/BACKWARD Buttons: Skip tracks or tune radio frequency.
- Przycisk WYSUŃ: Release the detachable front panel.
4.2 Połączenia tylne
The rear of the unit features standard ISO connectors for power and speakers, along with an antenna input.
- ISO Power Connector: For connecting to the vehicle's power supply (constant 12V, ignition 12V, ground).
- ISO Speaker Connector: For connecting to the vehicle's speakers (Front Left, Front Right, Rear Left, Rear Right).
- Wejście antenowe: Do podłączenia anteny radiowej samochodu.
5. Konfiguracja
5.1 Instalacja
- Odłącz akumulator: Before starting, disconnect the negative terminal of your car battery to prevent short circuits.
- Usuń starą jednostkę: Ostrożnie wyjmij radio samochodowe z deski rozdzielczej.
- Montaż ramy montażowej: Insert the supplied mounting frame into the dashboard opening and bend the tabs to secure it.
- Podłącz okablowanie: Refer to the wiring diagram in section 5.2. Connect the ISO wiring harness to the car's wiring and then to the Caliber RMD 068-2 unit. Connect the antenna cable.
- Slide Unit In: Carefully slide the Caliber RMD 068-2 unit into the mounting frame until it clicks into place.
- Podłącz ponownie akumulator: Podłącz ponownie zacisk ujemny akumulatora samochodowego.
- Zamontuj panel przedni: Attach the detachable front panel to the main unit.
5.2 Schemat okablowania
The Caliber RMD 068-2 uses standard ISO connectors. Ensure correct connections as shown below. If your vehicle does not have ISO connectors, an adapter may be required.
| Numer pina | Kolor przewodu (typowy) | Funkcjonować |
|---|---|---|
| 4 | Żółty | Stałe 12 V (akumulator) |
| 7 | Czerwony | Przełączane 12 V (zapłon) |
| 8 | Czarny | Grunt |
| 5 | Niebieski | Antenna Remote Out |
| Numer pina | Kolor przewodu (typowy) | Funkcjonować |
|---|---|---|
| 1 | Fioletowy | Tylny Prawy (+) |
| 2 | Fioletowy/Czarny | Prawy tył (-) |
| 3 | Zielony | Lewy tył (+) |
| 4 | Zielony/Czarny | Lewy tył (-) |
| 5 | Szary | Przód Prawy (+) |
| 6 | Szary/Czarny | Przednie prawe (-) |
| 7 | Biały | Lewy przód (+) |
| 8 | Biały/Czarny | Przedni lewy (-) |
Note: Wire colors may vary depending on vehicle manufacturer. Always consult your vehicle's wiring diagram.
6. Instrukcja obsługi
6.1 Podstawowe funkcje
- Włączanie/wyłączanie: Naciśnij TRYB ZASILANIA przycisk, aby włączyć lub wyłączyć urządzenie.
- Regulacja głośności: Obróć TOM Obróć pokrętło zgodnie z ruchem wskazówek zegara, aby zwiększyć głośność, lub przeciwnie do ruchu wskazówek zegara, aby ją zmniejszyć.
- Wybór trybu: Naciśnij krótko TRYB ZASILANIA button to cycle through available modes: Radio (FM), USB, SD, AUX.
- Ustawienia audio: Naciśnij TOM knob to enter audio settings. Rotate the knob to select settings like BASS, TREBLE, BALANCE, FADER. Press the knob again to confirm or move to the next setting.
6.2 Działanie radiowe
- Wybór zespołu: W trybie radia naciśnij ZESPÓŁ/AMS przycisk umożliwiający przełączanie między pasmami FM1, FM2 i FM3.
- Strojenie ręczne: Naciśnij krótko DO PRZODU DO TYŁU przyciski do precyzyjnego dostrojenia częstotliwości.
- Automatyczne wyszukiwanie: Naciśnij i przytrzymaj DO PRZODU DO TYŁU przyciski umożliwiające automatyczne wyszukiwanie kolejnej stacji o silnym sygnale.
- Przechowuj ustawienia wstępne: Tune to your desired station. Long press one of the PRESET (1-6) buttons until you hear a beep. The station is now stored.
- Przywołaj ustawienia wstępne: Short press one of the PRESET (1-6) przyciski umożliwiające przywołanie zapisanej stacji.
- Automatyczny zapis w pamięci (AMS): Naciśnij i przytrzymaj ZESPÓŁ/AMS button to automatically scan and store the strongest stations into the current band's presets.
6.3 Odtwarzanie USB/SD
- Włóż media: Insert a USB flash drive into the USB port or an SD card into the SD card slot. The unit will automatically switch to USB/SD mode and begin playback.
- Odtwórz/Pauza: Naciśnij ODTWÓRZ/PAUZA przycisk, aby wstrzymać lub wznowić odtwarzanie.
- Pomiń ścieżkę: Naciśnij krótko DO PRZODU DO TYŁU przyciski, aby przejść do następnego lub poprzedniego utworu.
- Szybkie przewijanie do przodu/do tyłu: Naciśnij i przytrzymaj DO PRZODU DO TYŁU buttons to fast forward or rewind within a track.
- Nawigacja po folderach: Użyj USTAWIENIE WSTĘPNE 5 I USTAWIENIE WSTĘPNE 6 buttons to navigate between folders on your USB/SD media.
6.4 Wejście AUX
- Podłącz urządzenie: Connect your external audio device (e.g., smartphone, MP3 player) to the 3.5mm AUX input jack on the front panel using an audio cable.
- Wybierz tryb AUX: Naciśnij TRYB ZASILANIA button repeatedly until "AUX" is displayed.
- Sterowanie odtwarzaniem: Control playback (play, pause, skip) directly from your connected external device. The car radio will control the volume.
7. Konserwacja
- Czyszczenie urządzenia: Use a soft, dry cloth to wipe the front panel and display. Do not use harsh chemicals, cleaning sprays, or abrasive cloths, as these can damage the surface.
- Odłączany panel przedni: When detaching the front panel, handle it carefully. Store it in a protective case (if supplied) to prevent scratches or damage.
- Porty USB/SD: Keep the USB port and SD card slot free from dust and debris.
8. Rozwiązywanie Problemów
| Problem | Możliwa przyczyna | Rozwiązanie |
|---|---|---|
| Brak zasilania | Przepalony bezpiecznik; Nieprawidłowe okablowanie; Luźne połączenie | Check and replace fuse; Verify wiring connections (Yellow to constant 12V, Red to ignition 12V, Black to ground); Ensure front panel is securely attached. |
| Brak dźwięku | Volume too low; Mute activated; Incorrect speaker wiring; Damaged speakers | Increase volume; Check if mute is active; Verify speaker connections; Test with known good speakers. |
| Słaby odbiór radia | Antena nie jest podłączona; Antena jest uszkodzona; Obszar o słabym sygnale | Ensure antenna is securely connected; Check antenna for damage; Try tuning to a stronger station or move to a different location. |
| USB/SD nie odtwarza się | Nieobsługiwane file format; Corrupted media; Incorrectly inserted media; Max capacity exceeded | Zapewnić files are MP3/WMA format; Try a different USB/SD card; Reinsert media correctly; Check media capacity (max 32GB recommended). |
| Front panel cannot be detached | Eject button not fully pressed; Mechanism jammed | Press the EJECT button firmly; Do not force the panel. |
If the problem persists after trying these solutions, please contact your dealer or a qualified service center.
9. Specyfikacje
- Model: Caliber RMD 068-2
- Moc wyjściowa: 4 x 75 Watts Max
- Zasilanie: 12V DC (10.8V-15.6V), Negative Ground
- bezpiecznik: 10A
- Obsługiwane formaty audio: MP3, WMA (przez USB/SD)
- USB/SD Compatibility: Do 32 GB (format FAT32)
- Tuner FM: RDS, 18 Presets
- Wejście AUX: Gniazdo stereo 3.5 mm
- Odłączany panel przedni: Tak
- Waga: Około 0.95 kg (2.09 funty)
10. Gwarancja i wsparcie
This Caliber product is covered by a warranty in accordance with applicable European laws. For detailed warranty terms and conditions, please refer to the warranty card included with your product or visit the official Caliber website. For technical support, troubleshooting assistance, or service inquiries, please contact your authorized Caliber dealer or the customer service department in your region. Please have your product model number (RMD 068-2) and proof of purchase ready when contacting support.
Note: Specifications and design are subject to change without notice for improvement.