
1. Wprowadzenie
This manual provides essential instructions for the safe and efficient operation of your Sharp CD-DH950P 240W Mini-Component System. This system features a 5-disc CD changer, a cassette deck, an iPod/iPhone docking station, a USB host for digital audio playback, and an AM/FM tuner. Please read this manual thoroughly before using the system and retain it for future reference.
2. Informacje dotyczące bezpieczeństwa
- Źródło zasilania: Podłączaj urządzenie wyłącznie do gniazdka prądu przemiennego o określonej mocy.tage.
- Wentylacja: Zapewnij odpowiednią wentylację. Nie blokuj otworów wentylacyjnych.
- Woda i wilgoć: Nie wystawiaj urządzenia na działanie deszczu, wilgoci ani kapiących i rozpryskujących się płynów.
- Ciepło: Trzymaj urządzenie z dala od źródeł ciepła, takich jak grzejniki, kratki wentylacyjne, piece i inne urządzenia wytwarzające ciepło.
- Czyszczenie: Przed czyszczeniem odłącz urządzenie od gniazdka ściennego. Użyj miękkiej, suchej ściereczki.
- Serwisowanie: Nie próbuj samodzielnie naprawiać tego produktu. Wszelkie czynności serwisowe należy powierzyć wykwalifikowanemu personelowi serwisowemu.
3. Zawartość opakowania
Sprawdź, czy w przesyłce znajdują się następujące elementy:
- Main Unit (CD-DH950P)
- Lewy głośnik
- Prawy głośnik
- Pilot z bateriami
- Antena pętlowa AM
- Antena przewodowa FM
- Przewód zasilający
4. Konfiguracja
4.1 Podłączanie głośników
Connect the speaker wires from the main unit to the corresponding terminals on the back of each speaker. Ensure correct polarity (red to red, black to black) for optimal sound quality. The left speaker connects to the left speaker output, and the right speaker to the right speaker output.
4.2 Podłączanie anten
- Antena FM: Connect the supplied FM wire antenna to the FM antenna terminal on the rear of the main unit. Extend the wire for better reception.
- Antena AM: Connect the supplied AM loop antenna to the AM antenna terminals on the rear of the main unit. Position the antenna for best reception.
4.3 Połączenie zasilania
Plug the power cord into the AC IN jack on the rear of the main unit, then plug the other end into a standard AC wall outlet.
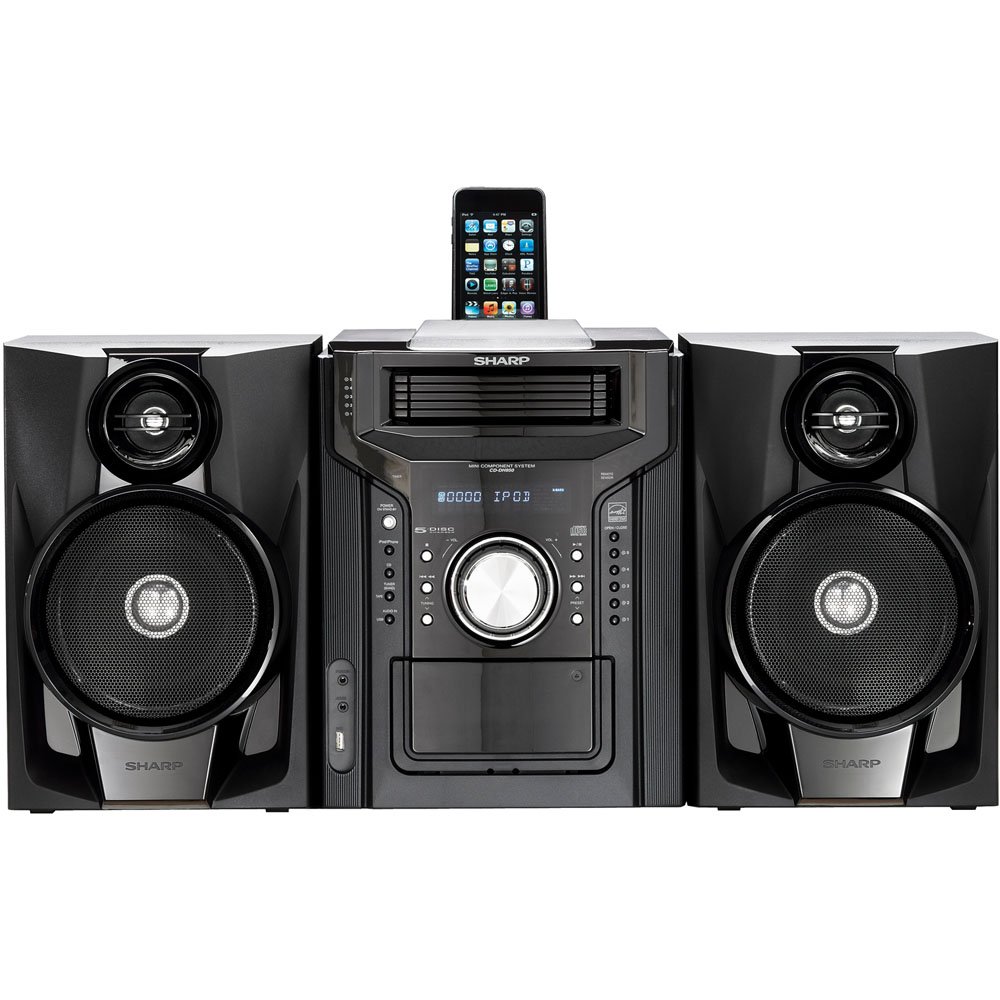
Rysunek 4.3.1: Ogólnie view of the Sharp CD-DH950P Mini-Component System, showing the main unit flanked by two speakers, with an iPhone docked on top of the main unit.
5. Instrukcja obsługi
5.1 Włączanie/wyłączanie i regulacja głośności
- Naciśnij MOC przycisk na panelu przednim lub pilocie, aby włączyć lub wyłączyć urządzenie.
- Obróć TOM pokrętło na panelu przednim lub użyj GŁOŚNOŚĆ +/- Przyciski na pilocie do regulacji poziomu dźwięku.
5.2 Odtwarzanie płyt CD
This system features a 5-disc CD changer.
- Naciśnij OTWÓRZ/ZAMKNIJ przycisk otwierający szufladę na płytę CD.
- Place up to five CDs on the disc trays, label side up.
- Naciskać OTWÓRZ/ZAMKNIJ ponownie, aby zamknąć tacę.
- Naciśnij CD przycisk, aby wybrać funkcję CD.
- Naciśnij ODTWÓRZ/PAUZA przycisk, aby rozpocząć odtwarzanie.
- Użyj POMINĄĆ buttons to navigate between tracks or discs.
5.3 Obsługa magnetofonu kasetowego
- Naciśnij TAPE OPEN/CLOSE button to open the cassette deck.
- Włóż kasetę magnetofonową.
- Naciśnij TAŚMA button to select the cassette function.
- Naciskać GRAĆ rozpocząć odtwarzanie.
- To record, ensure the source is selected (e.g., CD, Tuner) and press the NAGRYWAĆ button on the cassette deck.
5.4 iPod/iPhone Docking
The system includes a top-mounted docking slot for compatible iPod and iPhone devices (30-pin connector).
- Carefully place your iPod or iPhone into the docking slot.
- The system will automatically switch to iPod/iPhone mode or you may need to press the iPod / iPhone przycisk.
- Use the system's controls or your device's controls to play music. The device will also charge while docked.
5.5 USB Host Playback
Connect a USB storage device containing MP3 or WMA audio files to the USB port on the front panel.
- Włóż urządzenie USB do portu USB.
- Naciśnij USB button to select the USB function.
- Use the playback controls to navigate and play files.
Tuner 5.6 AM/FM
- Naciśnij TUNER przycisk umożliwiający wybór radia AM lub FM.
- Użyj Strojenie +/- przyciski umożliwiające ręczne dostrojenie się do stacji.
- To auto-scan, press and hold the Strojenie +/- pikolak.
- To store a preset, tune to the desired station, then press PAMIĘĆ po którym następuje wstępnie ustawiony numer.
5.7 wejście audio
Connect an external audio device (e.g., MP3 player, smartphone) to the AUDIO IN jack on the front panel using a 3.5mm stereo cable.
- Connect your device to the AUDIO IN jack.
- Naciśnij WEJŚCIE AUDIO przycisk, aby wybrać to źródło.
- Steruj odtwarzaniem z podłączonego urządzenia.
6. Konserwacja
6.1 Czyszczenie urządzenia
Przetrzyj obudowę urządzenia miękką, suchą ściereczką. Nie używaj środków czyszczących o właściwościach ściernych, wosków ani rozpuszczalników. Przed czyszczeniem upewnij się, że urządzenie jest odłączone od zasilania.
6.2 Pielęgnacja płyt CD i kaset
- Handle CDs by their edges to avoid fingerprints and scratches. Clean discs with a soft, lint-free cloth from the center outwards.
- Store cassette tapes away from strong magnetic fields and direct sunlight.
7. Rozwiązywanie Problemów
| Problem | Możliwa przyczyna | Rozwiązanie |
|---|---|---|
| Brak zasilania | Przewód zasilający nie jest podłączony; gniazdko elektryczne jest uszkodzone | Sprawdź, czy przewód zasilający jest prawidłowo podłączony; spróbuj użyć innego gniazdka. |
| Brak dźwięku | Zbyt niski poziom głośności; Głośniki nie są podłączone; Wybrano nieprawidłowe źródło | Zwiększ głośność; Sprawdź połączenia głośników; Wybierz prawidłowe źródło sygnału wejściowego |
| Płyta CD nie odtwarza się | Disc inserted incorrectly; Disc is dirty or scratched | Insert disc correctly (label side up); Clean or replace disc |
| Słaby odbiór radia | Antena nie jest prawidłowo ustawiona; słaby sygnał | Adjust position of AM/FM antennas; Try auto-tuning or manual fine-tuning |
| iPod/iPhone not charging/playing | Device not properly docked; Device not compatible (e.g., newer connector) | Re-dock the device; Note that this system uses a 30-pin connector, newer devices may require an adapter (not included) |
8. Specyfikacje
- Marka: Ostry
- Model: CD-DH950P
- Całkowita moc wyjściowa: 240 Watts RMS (85W/ch FTC)
- Konfiguracja głośników: Kanał 2.1
- Obsługiwane formaty audio: CD, MP3, WMA
- Stosunek sygnału do szumu: 100dB
- Zgodne urządzenia: MP3 Player, Smartphone (via 30-pin dock or USB/Audio In)
- Wymiary (dł. x szer. x wys.): 27.6 x 13.6 x 13.5 cala
- Waga przedmiotu: 24.4 funtów
- Kod UPC: 074000369863, 074000369290
9. Informacje o gwarancji
This product is covered by a 1-year limited warranty from the date of purchase. Please refer to the warranty card included with your product for full terms and conditions, or contact Sharp customer service for details.
10. Wsparcie
For further assistance, technical support, or service inquiries, please contact Sharp customer service. Contact information can typically be found on the Sharp official webstronie internetowej lub w dokumentacji dołączonej do produktu.