1. Wprowadzenie
This manual provides essential information for the proper setup, operation, and maintenance of your Thorens TD-235 Semi-automatic Turntable. Please read these instructions carefully before using your turntable to ensure optimal performance and longevity of the unit.
2. Instrukcje bezpieczeństwa
- Nie wystawiać urządzenia na działanie deszczu i wilgoci.
- Nie otwieraj obudowy. Wszelkie prace serwisowe zleć wykwalifikowanemu personelowi.
- Ensure the turntable is placed on a stable, level surface away from direct sunlight, heat sources, and excessive vibration.
- Jeśli urządzenie nie będzie używane przez dłuższy czas, należy odłączyć przewód zasilający od gniazdka ściennego.
- Handle the stylus with care to prevent damage and ensure proper playback.
3. Zawartość opakowania
Sprawdź, czy w opakowaniu znajdują się wszystkie wymienione poniżej elementy:
- Thorens TD-235 Turntable Unit
- Osłona przeciwpyłowa
- Talerz
- Pas napędowy
- Mata filcowa
- Przeciwwaga
- Waga antyskatingowa
- Zasilacz
- Kabel audio (RCA)
- AT-95E Cartridge (pre-installed or separate)
- Instrukcja obsługi (ten dokument)
4. Konfiguracja
4.1 Rozpakowywanie i umieszczanie
Carefully remove all components from the packaging. Place the turntable on a flat, stable surface. Ensure adequate ventilation around the unit.
4.2 Montaż talerza i pasa
- Umieść talerz na środkowym wrzecionie.
- Locate the drive belt. Carefully stretch the belt around the inner rim of the platter and then around the motor pulley. Ensure the belt is not twisted.
- Połóż filcową matę na wierzchu talerza.

Obraz: widok z góry view of the Thorens TD-235 turntable with the dust cover closed, illustrating the assembled unit.
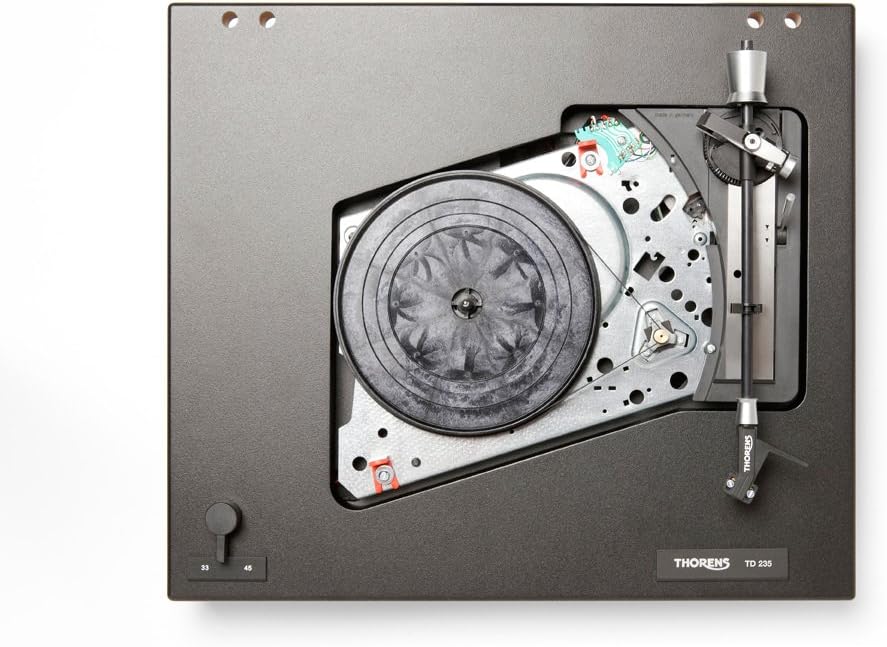
Obraz: Wewnętrzny view of the Thorens TD-235 turntable with the platter removed, showing the motor and belt drive system for installation reference.
4.3 Cartridge and Tonearm Setup
The TD-235 typically comes with an AT-95E cartridge pre-installed. If not, carefully mount the cartridge to the headshell following the cartridge manufacturer's instructions.
- Regulacja przeciwwagi: Slide the counterweight onto the rear of the tonearm. Adjust it until the tonearm is balanced and floats horizontally. Lock the counterweight in place.
- Tracking Force Setting: Refer to the cartridge specifications (e.g., 2.0 grams for AT-95E). Rotate the numbered ring on the counterweight to the desired tracking force without moving the counterweight itself.
- Regulacja antypoślizgowa: Attach the anti-skating weight to the small fishing line and loop it over the anti-skating rod. Set the anti-skating force to match the tracking force.

Obraz: Szczegółowy view of the tonearm assembly, highlighting the cartridge, counterweight, and anti-skating system for precise adjustment.
4.4 Montaż osłony przeciwpyłowej
Insert the hinges of the dust cover into the receptacles at the rear of the turntable plinth.
4.5 złącza audio i zasilania
- Connect the integrated RCA audio cables from the turntable to the PHONO input of your amplifier or receiver. Ensure the ground wire is connected to the ground terminal on your ampliyfikator.
- Connect the power adapter to the DC input on the turntable and then plug it into a wall outlet.
5. Instrukcja obsługi
5.1 Włączanie/wyłączanie
The turntable powers on automatically when the tonearm is moved over the platter and powers off when the tonearm returns to its rest or after the record finishes playing.
5.2-stopniowy wybór prędkości
Use the speed selector switch, typically located on the front left of the plinth, to choose between 33 1/3 RPM for LPs and 45 RPM for singles. Ensure the correct speed is selected for the record you are playing.
5.3 Odtwarzanie płyty
- Połóż płytę na macie filcowej położonej na talerzu.
- Odblokuj ramię gramofonu, odłączając je od podstawki.
- Delikatnie podnieś ramię gramofonu za pomocą dźwigni.
- Move the tonearm over the desired starting groove of the record. The platter should begin to spin automatically.
- Lower the cueing lever slowly to allow the stylus to descend onto the record.

Image: The Thorens TD-235 turntable with its dust cover open, ready for operation, displaying the main components.
5.4 Zatrzymywanie odtwarzania
When the record reaches the end of the last track, the tonearm will automatically lift and return to its rest, and the platter will stop spinning. To stop playback manually:
- Podnieś ramię gramofonu za pomocą dźwigni.
- Gently guide the tonearm back to its rest.
- Lower the cueing lever.
- Lock the tonearm in its rest position. The platter should stop spinning shortly after.
6. Konserwacja
6.1 Czyszczenie rysika
Regularnie czyść igłę miękką szczoteczką przeznaczoną do czyszczenia igieł, delikatnie szczotkując ją od tyłu do przodu. Zabrudzona igła może pogorszyć jakość dźwięku i uszkodzić płyty.
6.2 Rejestry czyszczenia
Keep your records clean to prevent dust and debris from accumulating on the stylus. Use a carbon fiber brush or a record cleaning solution and cloth before each play.
6.3 Czyszczenie gramofonu
Wipe the plinth and dust cover with a soft, dry, lint-free cloth. For stubborn marks, a slightly damp cloth can be used, followed by a dry cloth. Avoid harsh chemicals or abrasive cleaners.
6.4 Wymiana paska napędowego
The drive belt may stretch or degrade over time, affecting speed stability. Replace the belt if you notice inconsistent speed or if it appears worn. Refer to section 4.2 for installation.
7. Rozwiązywanie Problemów
| Problem | Możliwa przyczyna | Rozwiązanie |
|---|---|---|
| Brak dźwięku lub niska głośność | Błędny amplifier input, loose connections, damaged stylus/cartridge. | Ensure RCA cables are securely connected to the PHONO input. Check ground wire. Inspect stylus for damage. |
| Zniekształcony dźwięk | Dirty stylus, incorrect tracking force/anti-skating, damaged record. | Clean stylus. Re-adjust tracking force and anti-skating. Try a different record. |
| Nieprawidłowa prędkość odtwarzania | Wrong speed selected, worn drive belt. | Verify speed selector switch. Inspect and replace drive belt if necessary. |
| Platter does not spin automatically | Tonearm not moved far enough over platter, power issue. | Ensure tonearm is moved fully over the record area. Check power connection. |
| Automatic stop/return not working | Mechanism obstruction, internal issue. | Ensure no physical obstructions. If problem persists, contact Thorens support. |
8. Specyfikacje
- Model: Thorens TD-235
- Typ: Semi-automatic Turntable
- Typ silnika: Silnik prądu stałego
- Prędkości: 33 1/3, 45 obr/min
- Nabój: AT-95E (included)
- Format sygnału: Analog
- Stosunek sygnału do szumu: 72dB
- Źródło zasilania: Elektryczny przewodowy
- Wymiary produktu: 16.14 x 13.39 x 5.12 cala (410 x 340 x 130 mm)
- Waga przedmiotu: 14.77 funtów (6.7 kg)
- Producent: Thorens
9. Gwarancja i wsparcie
Thorens products are covered by a manufacturer's warranty. Please refer to the warranty card included with your product or visit the official Thorens website for detailed warranty terms and conditions. For technical support or service inquiries, please contact your authorized Thorens dealer or the Thorens customer service department.
For further assistance, you may visit the official Thorens webstrona: www.thorens.pl