1. Wprowadzenie
The SPL 2Control is a compact and user-friendly stereo monitor controller designed to provide comprehensive control over your digital audio workstation's (DAW) monitoring functions. It ensures high-quality audio reproduction through both studio monitors and headphones, allowing you to hear every detail of your mix. Key features include a precise speaker volume potentiometer, active circuitry for sound integrity, and a unique Crossfeed control for accurate headphone monitoring that simulates a stereo speaker image.
2. Instrukcje bezpieczeństwa
- Przed przystąpieniem do użytkowania urządzenia należy uważnie przeczytać niniejszą instrukcję.
- Zachowaj tę instrukcję do wykorzystania w przyszłości.
- Aby uniknąć pożaru lub porażenia prądem, nie wystawiaj urządzenia na działanie deszczu i wilgoci.
- Zapewnij odpowiednią wentylację, nie blokuj żadnych otworów wentylacyjnych.
- Używaj wyłącznie dodatków/akcesoriów wskazanych przez producenta.
- Odłączaj przewód zasilający podczas burzy z piorunami lub jeśli nie używasz urządzenia przez dłuższy czas.
- Wszelkie prace serwisowe należy powierzać wykwalifikowanemu personelowi.
- Unikaj umieszczania urządzenia w pobliżu źródeł ciepła, takich jak grzejniki, kratki wentylacyjne, piece lub inne urządzenia (w tym amp(lifiers) wytwarzające ciepło.
3. Zawartość opakowania
Po rozpakowaniu sprawdź, czy w przesyłce znajdują się następujące elementy:
- 1 x SPL 2Control Module
- 1 x Przewód zasilający
- Ta instrukcja obsługi
4. Koniec produktuview
4.1 Elementy sterujące i wskaźniki na panelu przednim
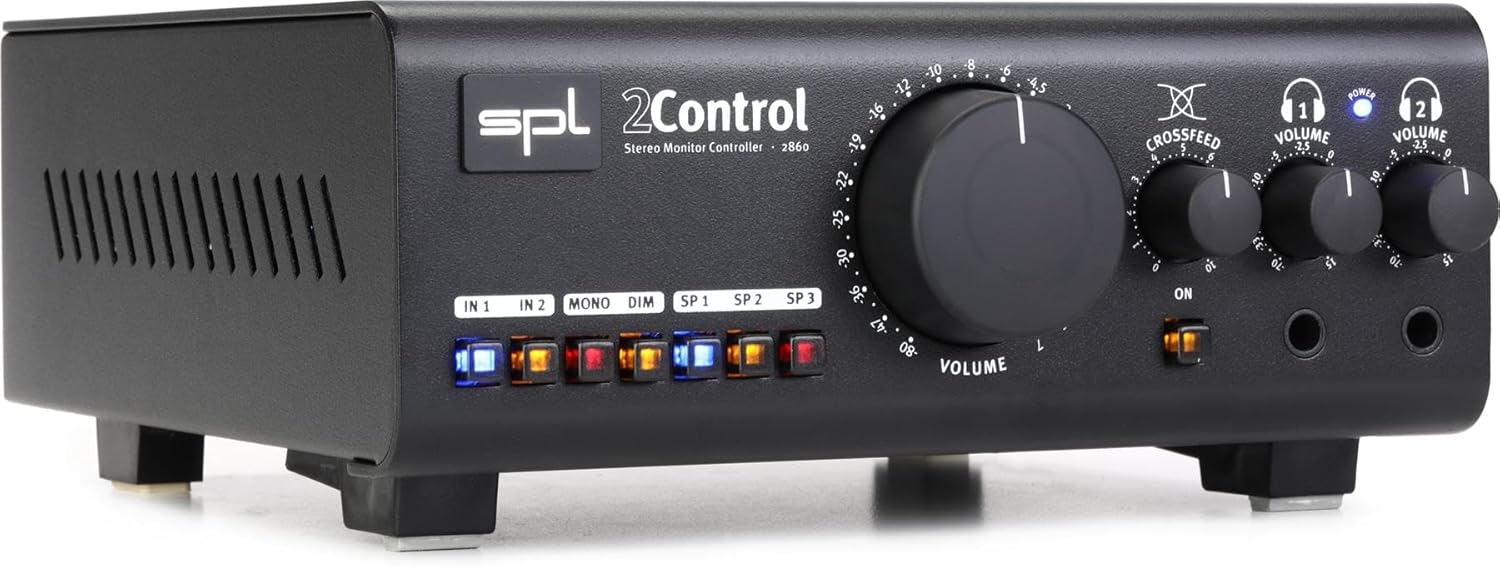
Rysunek 1: Front Panel of the SPL 2Control Stereo Monitor Controller.
This image displays the front panel of the SPL 2Control. From left to right, it features input selection buttons (IN 1, IN 2), function buttons (MONO, DIM), speaker output selection buttons (SP 1, SP 2, SP 3), a large central master VOLUME knob, a CROSSFEED knob, and two individual headphone VOLUME knobs with corresponding headphone output jacks. A power indicator LED is visible above the headphone controls.
- IN 1 / IN 2 Buttons: Selects the active stereo input source.
- MONO Button: Sums the stereo signal to mono for compatibility checking.
- Przycisk przyciemniania: Reduces the output volume by a fixed amount (e.g., -20dB) for temporary level reduction.
- SP 1 / SP 2 / SP 3 Buttons: Selects the active stereo speaker output pair.
- Gałka GŁOŚNOŚCI: Master volume control for selected speaker outputs.
- CROSSFEED Knob: Adjusts the stereo panorama for headphone monitoring to simulate a speaker listening environment.
- HEADPHONE VOLUME 1 / 2 Knobs: Independent volume controls for the two headphone outputs.
- HEADPHONE 1 / 2 Jacks: 1/4-inch stereo headphone outputs.
- DIODA ZASILANIA: Oznacza, że jednostka jest włączona.
4.2 Rear Panel Connections (Inferred)
The rear panel typically houses the audio input and output connections, as well as the power input. Based on common audio equipment and product specifications, you can expect:
- Wejścia analogowe: Balanced XLR or TRS inputs for connecting your audio interface or mixer.
- Wyjścia głośnikowe: Multiple sets of balanced XLR or TRS outputs for connecting up to three pairs of studio monitors.
- Pobór mocy: Connector for the included power cord.
5. Konfiguracja
- Umieszczenie: Position the SPL 2Control on a stable, flat surface, ensuring adequate ventilation around the unit.
- Podłączenie zasilania: Connect the provided power cord to the power input on the rear panel of the 2Control and then to a suitable AC power outlet.
- Połączenia wejściowe: Connect the stereo outputs of your audio interface, mixer, or other audio source to the IN 1 and/or IN 2 inputs on the rear panel using balanced XLR or TRS cables.
- Połączenia głośnikowe: Connect your studio monitors to the SP 1, SP 2, and/or SP 3 outputs on the rear panel using balanced XLR or TRS cables. Ensure correct left and right channel connections.
- Połączenia słuchawkowe: Plug your headphones into the HEADPHONE 1 and/or HEADPHONE 2 jacks on the front panel.
- Pierwsze włączenie: Ensure all volume controls are set to their minimum positions before powering on the unit. Then, connect the power cord to the wall outlet. The POWER LED on the front panel will illuminate.
6. Instrukcja obsługi
- Wybór wejścia: Naciśnij albo W 1 or W 2 button to select your desired audio source. The active button will illuminate.
- Selecting Speaker Outputs: Naciśnij SP 1, SP 2, Lub SP 3 button to route the audio to the corresponding pair of studio monitors. Only one speaker output can be active at a time.
- Regulacja głośności głównej: Slowly turn the large TOM knob clockwise to increase the listening level for the selected speaker outputs. Turn counter-clockwise to decrease.
- Mono Summing: Naciśnij MONONUKLEOZA button to sum the stereo signal to mono. This is useful for checking phase compatibility and mix balance. Press again to return to stereo.
- Funkcja przyciemniania: Naciśnij CIEMNY button to temporarily reduce the output volume. This is useful for quick conversations or when you need to lower the volume without losing your main volume setting. Press again to restore the original volume.
- Monitorowanie słuchawek:
- Plug your headphones into the desired headphone jack (HEADPHONE 1 or 2).
- Dostosuj indywidualnie HEADPHONE VOLUME 1 or 2 knob to set the listening level for your headphones.
- Użyj PRZESUW POPRZECZNY knob to adjust the stereo image for headphone listening. Turning it clockwise increases the crossfeed, simulating a more natural speaker-like stereo field by blending the left and right channels slightly.
7. Konserwacja
- Czyszczenie: Do czyszczenia zewnętrznej części urządzenia należy używać miękkiej, suchej ściereczki. Nie należy używać płynnych środków czyszczących ani rozpuszczalników.
- Wentylacja: Ensure that the ventilation slots are kept clear of dust and debris to prevent overheating.
- Składowanie: Jeśli urządzenie będzie przechowywane przez dłuższy czas, należy odłączyć je od zasilania i przechowywać w chłodnym, suchym miejscu.
8. Rozwiązywanie Problemów
| Problem | Możliwa przyczyna | Rozwiązanie |
|---|---|---|
| Brak dźwięku z głośników. |
|
|
| Brak dźwięku w słuchawkach. |
|
|
| Zniekształcony dźwięk. |
|
|
9. Specyfikacje
| Funkcja | Szczegół |
|---|---|
| Nazwa modelu | 2 Control (also known as 2860) |
| Marka | SPL |
| Typ głośnika | Monitor |
| Zalecane zastosowania | Control, Volume for Monitors |
| Kompatybilne urządzenia | Monitors, Speakers |
| Konfiguracja kanału dźwięku przestrzennego | 2.0 |
| Kolor | Czarny |
| Zawarte komponenty | 1 x SPL Control Module |
| Wymiary produktu (Gł. x Szer. x Wys.) | 8.66" x 8.46" x 3.15" |
| Waga przedmiotu | 7.06 funta (ok. 3.2 kg) |
| Źródło zasilania | Elektryczny przewodowy |
| Technologia łączności | TRS, XLR |
| Tryb wyjścia audio | Stereofoniczny |
| Typ montażu | Uchwyt na blat |
| Producent | Sound Performance Lab |
10. Gwarancja i wsparcie
The SPL 2Control Monitor Controller comes with a limited warranty. For specific warranty terms, duration, and conditions, please refer to the documentation provided with your purchase or visit the official SPL website. For technical support, service, or inquiries, please contact the manufacturer, Sound Performance Lab, or your authorized dealer.
Producent: Sound Performance Lab