1. Wprowadzenie
This manual provides essential instructions for the proper installation, operation, and maintenance of your Genuine Kirby Ultimate G Hose Assembly. This hose is designed specifically for Kirby Ultimate G series vacuum cleaners, ensuring optimal performance and compatibility. Please read these instructions thoroughly before use to ensure safe and effective operation.
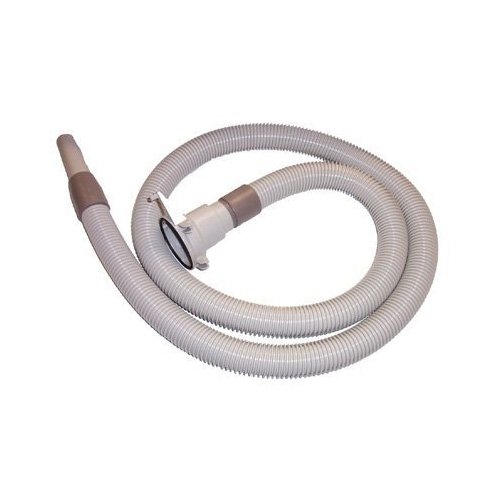
Image 1.1: The Genuine Kirby Ultimate G Hose Assembly. This image displays the complete hose assembly, highlighting its flexible construction and connection points.
2. Konfiguracja i instalacja
Follow these steps to correctly attach the hose assembly to your Kirby Ultimate G vacuum cleaner.
- Przygotuj odkurzacz: Ensure your Kirby vacuum cleaner is turned off and unplugged from the power outlet before beginning installation.
- Locate the Hose Port: Identify the hose attachment port on your Kirby Ultimate G vacuum. This is typically located on the front or side of the main power unit.
- Podłącz wąż: Align the male end of the hose assembly with the vacuum's hose port. Push firmly until it clicks securely into place. A secure connection is crucial for maintaining proper suction.
- Sprawdź połączenie: Gently tug on the hose to ensure it is firmly attached and will not detach during use.

Image 2.1: Kirby vacuum cleaner head. This image shows the front of a Kirby vacuum, illustrating the general area where the hose connects to the main unit.
3. Instrukcja obsługi
Once the hose is securely attached, you can begin using your Kirby vacuum with various attachments.
- Dołącz akcesoria: Connect desired cleaning accessories (e.g., crevice tool, upholstery tool, extension wands) to the free end of the hose. Ensure each accessory is firmly seated.
- Włączanie: Plug the vacuum cleaner into a suitable power outlet and turn on the unit.
- Rozpocznij czyszczenie: Use the hose and attached accessory to clean surfaces such as upholstery, stairs, or tight spaces.
- Utrzymuj prawidłowy przepływ powietrza: Avoid kinking or excessively bending the hose during operation, as this can restrict airflow and reduce suction efficiency.
- Rozłączanie: After use, turn off and unplug the vacuum. Press the release button (if present) or twist the hose connection to detach it from the vacuum. Remove accessories from the hose.

Image 3.1: Kirby vacuum in use. This image shows a Kirby vacuum cleaner being operated, demonstrating typical usage scenarios where the hose assembly would be utilized with various attachments.
4. Konserwacja
Regular maintenance helps prolong the life and efficiency of your hose assembly.
- Sprawdź, czy nie ma uszkodzeń: Periodically check the hose for cracks, tears, punctures, or any signs of wear. Damaged hoses can lead to loss of suction and reduced performance.
- Usuń przeszkody: If suction decreases, disconnect the hose and inspect it for blockages. Carefully remove any debris using a long, blunt object. Do not use sharp objects that could puncture the hose.
- Czyszczenie: Wytrzyj zewnętrzną część węża wodąamp szmatką do usunięcia kurzu i brudu. Unikaj stosowania ostrych środków chemicznych lub ściernych środków czyszczących.
- Składowanie: Store the hose in a cool, dry place, away from direct sunlight and extreme temperatures. Avoid storing it in a tightly coiled or kinked position to prevent permanent damage.
5. Rozwiązywanie Problemów
W tej sekcji znajdziesz informacje o typowych problemach i ich rozwiązaniach.
| Problem | Możliwa przyczyna | Rozwiązanie |
|---|---|---|
| Utrata ssania | Hose kinked or blocked; improper connection; hose damage. | Straighten hose, check for and remove blockages. Ensure hose is securely attached. Inspect for damage and replace if necessary. |
| Hose Detaches During Use | Improper connection; worn connection points. | Ensure hose is fully inserted and locked into place. If connection points are worn, the hose or vacuum port may need service. |
| Hose is Stiff or Cracked | Age; exposure to extreme temperatures or chemicals. | This indicates material degradation. The hose should be replaced to prevent further damage and maintain performance. |
6. Specyfikacje
Key specifications for the Kirby Ultimate G Hose Assembly.
- Wymiary produktu: 1 x 1 x 1 inches (Note: This may represent packaging dimensions; actual hose length varies by model and is flexible.)
- Waga przedmiotu: 1 funt (około 16 uncji)
- Tworzywo: Plastik, Guma
- Kolor: Biały
- Zgodność: Designed for Kirby Ultimate G series vacuum cleaners.
7. Gwarancja i wsparcie
For warranty information and customer support, please refer to the documentation provided with your original Kirby vacuum cleaner or visit the official Kirby website. Genuine Kirby parts are designed for durability and performance. Using non-genuine parts may void your vacuum's warranty and affect its operation.
If you require further assistance or need to purchase replacement parts, please contact Kirby customer service or an authorized Kirby dealer.