
Wstęp
This manual provides detailed instructions for the proper setup, operation, and maintenance of your Kodak EasyShare M893IS Digital Camera. Please read this manual thoroughly before using your camera to ensure optimal performance and longevity.
1. Konfiguracja
1.1. Montaż i ładowanie akumulatora
The Kodak EasyShare M893IS uses a rechargeable Lithium-Ion battery. Ensure the battery is fully charged before first use.
- Znajdź pokrywę komory baterii na spodzie lub z boku aparatu.
- Przesuń zatrzask, aby otworzyć komorę.
- Insert the Li-Ion battery with the contacts facing inward, ensuring it clicks into place.
- Dokładnie zamknij pokrywę komory baterii.
- Connect the camera to a power source using the provided USB cable for in-camera charging. The charging indicator light will show the charging status.

Rysunek 1.1: Strona view of the camera, indicating the general location of the battery compartment.
1.2. Instalacja karty pamięci
The camera supports SD/SDHC memory cards (not included). A memory card is required to store photos and videos.
- Open the battery compartment door. The memory card slot is usually located next to the battery.
- Insert the SD/SDHC card into the slot with the metal contacts facing the correct direction (refer to the diagram inside the compartment). Push until it clicks into place.
- Zamknij pokrywę komory baterii.
2. Obsługa aparatu
2.1. Sterowanie kamerąview
Familiarize yourself with the main controls of your Kodak EasyShare M893IS camera.

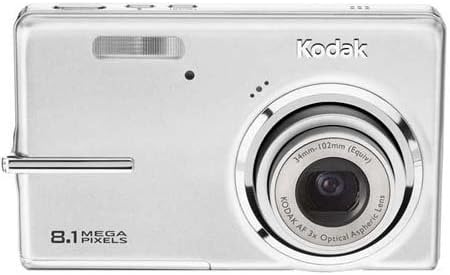
Rycina 2.1: Przód view of the camera. Key components include the lens, flash, and microphone.
- Przycisk zasilania: Located on the top panel, turns the camera on/off.
- Spust migawki: Naciśnij do połowy, aby ustawić ostrość, naciśnij do końca, aby zrobić zdjęcie.
- Dźwignia zoomu: Controls the 3x optical zoom and 5x digital zoom.
- Pokrętło/przycisk trybu: Selects shooting modes (e.g., Auto, Program, Scene modes).
- Ekran LCD: 2.7-inch display for framing shots, reviewprzeglądanie obrazów i poruszanie się po menu.
- Klawiatura kierunkowa/przycisk OK: Służy do nawigacji po menu i dokonywania wyborów.
- Przycisk menu: Dostęp do ustawień i opcji aparatu.
- Review/Playback Button: Displays captured photos and videos.
- Przycisk usuwania: Removes unwanted images or videos.
- Przycisk udostępniania: For easy sharing options (if configured).
Rysunek 2.2: Tył view of the camera, showing the 2.7-inch LCD and control buttons.
2.2. Robienie zdjęć
- Włącz kamerę naciskając przycisk zasilania.
- Select your desired shooting mode using the Mode dial/button. Common modes include:
- Automatyczny: Camera automatically adjusts settings for most situations.
- Tryby scen: Specific settings for various scenarios like 'Night mode' or 'Sports'.
- Frame your shot using the LCD screen. Use the zoom lever to adjust the 3x optical zoom or 5x digital zoom.
- Press the Shutter button halfway down to allow the camera to focus (Contrast Detection Auto Focus, Multi-zone, Center Spot options available). A green frame indicates focus lock.
- Press the Shutter button fully to capture the image. The camera features optical image stabilization to reduce blur.
- For low-light conditions, adjust the flash mode (Auto, On, Off, Slow Synch) or utilize the High ISO (up to 1600) setting.
2.3. Nagrywanie filmów
- Switch the camera to video recording mode (refer to your camera's mode dial/menu for the video icon).
- Wykadruj obiekt na ekranie LCD.
- Naciśnij przycisk migawki, aby rozpocząć nagrywanie. Naciśnij go ponownie, aby zatrzymać.
- Videos are recorded in VGA resolution (640 x 480 at 15 fps or 320 x 240 at 30 fps) in MJPEG format.
2.4. AdviewTworzenie i zarządzanie mediami
- Naciśnij Odpview/Playback button to view Twoje zdjęcia i filmy.
- Use the directional pad to scroll through your media.
- To delete an unwanted item, select it and press the Delete button. Confirm deletion when prompted.
- Connect the camera to a computer via USB to transfer files.
3. Konserwacja
3.1. Czyszczenie aparatu
- Obiektyw: Użyj miękkiej, niepozostawiającej włókien ściereczki przeznaczonej specjalnie do obiektywów aparatów. Delikatnie przecieraj okrężnymi ruchami. Unikaj stosowania silnych środków chemicznych.
- Ekran LCD: Wipe with a soft, dry microfiber cloth. For stubborn smudges, slightly dampWyczyść szmatkę wodą lub płynem do czyszczenia ekranów.
- Korpus aparatu: Do usuwania kurzu i odcisków palców używaj miękkiej, suchej ściereczki.
3.2. Pielęgnacja baterii
- Gdy nie używasz baterii, przechowuj ją w chłodnym i suchym miejscu.
- Aby przedłużyć żywotność akumulatora, należy unikać jego całkowitego rozładowywania.
- Jeśli aparat będzie przechowywany przez dłuższy czas, należy wyjąć baterię.
3.3. Przechowywanie
Store the camera in a protective case or bag to prevent scratches and damage from dust or moisture. Avoid extreme temperatures.
4. Rozwiązywanie Problemów
| Problem | Możliwa przyczyna | Rozwiązanie |
|---|---|---|
| Kamera się nie włącza. | Bateria jest rozładowana lub nieprawidłowo włożona. | Charge the battery. Ensure the battery is inserted correctly with contacts aligned. |
| Zdjęcia są nieostre. | Drżenie aparatu, ruch obiektu lub nieprawidłowa ostrość. | Hold the camera steady. Ensure the subject is within the camera's focus range. Use optical image stabilization. Increase ISO in low light. |
| Komunikat „Błąd karty pamięci”. | Karta pamięci jest pełna, uszkodzona lub nieprawidłowo włożona. | Insert a new or empty SD/SDHC card. Reinsert the card. Format the card (this will erase all data). |
| Lampa błyskowa się nie uruchamia. | Lampa błyskowa jest wyłączona lub bateria jest słaba. | Change flash mode to "Auto" or "On". Charge the battery. |
| Nie można przesłać zdjęć do komputera. | Incorrect USB connection or driver issues. | Ensure USB cable is securely connected to both camera and computer. Try a different USB port. Check computer's device manager for driver issues. |
5. Specyfikacje
| Funkcja | Szczegół |
|---|---|
| Nazwa modelu | Easyshare M893IS |
| Rozdzielczość czujnika fotograficznego | 8.1 MP |
| Zoom optyczny | 3x |
| Zoom cyfrowy | 5x |
| Stabilizacja obrazu | Optyczny |
| Rozmiar ekranu | 2.7-calowy wyświetlacz LCD |
| Utrzymany File Format | JPEG (Stills), MJPEG (Video) |
| Rozdzielczość wideo | 640 x 480 (15 fps), 320 x 240 (30 fps) |
| Czułość ISO | Rozszerzone ISO minimum 80, rozszerzone ISO maksimum 1600 |
| Minimalna prędkość migawki | 4 sekund |
| Maksymalna prędkość migawki | 1/2000 sekundy |
| Tryby Flash | Auto, On, Off, Slow Synch |
| Typ baterii | Litowo-jonowy |
| Łączność | USB |
| Compatible Flash Memory | SD, SDHC (do 32 GB) |
| Waga przedmiotu | 0.35 funtów |
| Kolor | Srebrny |
6. Informacje o gwarancji
Your Kodak EasyShare M893IS Digital Camera is covered by a 1-roczna ograniczona gwarancja from the date of purchase. This warranty covers manufacturing defects and workmanship under normal use. It does not cover damage caused by misuse, accidents, unauthorized modifications, or external causes.
Please retain your proof of purchase for warranty claims. For detailed terms and conditions, refer to the warranty card included with your product or visit the official Kodak support webstrona.
7. Obsługa klienta
If you encounter any issues not covered in the troubleshooting section or require further assistance, please contact Kodak Customer Support.
- Wsparcie online: Odwiedź oficjalną pomoc techniczną firmy Kodak webStrona z odpowiedziami na często zadawane pytania, sterownikami i oprogramowaniem do pobrania.
- Wsparcie telefoniczne: Refer to your product packaging or the Kodak webwitryna z regionalnymi numerami kontaktowymi.
- When contacting support, please have your camera model (M893IS) and serial number ready.