1. Wprowadzenie
Dziękujemy za zakupasing the JVC XVN330B DVD Video Player. This player is designed to provide high-quality video and audio playback from various disc formats. Key features include Digital Direct Progressive Scan output, 192kHz/24-bit audio D/A converter, 10-bit/54MHz video D/A converter, and multi-format compatibility (DVD-R/RW, DVD+R/RW, CD-R/RW, VCD/SVCD, MP3, and JPEG). This manual provides essential information for the safe and efficient operation of your device.
2. Informacje dotyczące bezpieczeństwa
- Źródło zasilania: Connect the player only to the specified power supply voltage.
- Wentylacja: Zapewnij odpowiednią wentylację wokół urządzenia. Nie blokuj otworów wentylacyjnych.
- Woda i wilgoć: Nie wystawiaj urządzenia na działanie deszczu ani wilgoci. Nie stawiaj na urządzeniu przedmiotów wypełnionych płynami.
- Ciepło: Trzymaj urządzenie z dala od źródeł ciepła, takich jak grzejniki, kratki wentylacyjne, piece lub inne urządzenia (w tym amp(lifiers) wytwarzające ciepło.
- Serwisowanie: Nie próbuj samodzielnie naprawiać tego produktu. Wszelkie czynności serwisowe należy powierzyć wykwalifikowanemu personelowi serwisowemu.
- Obsługa dysków: Handle discs by their edges. Avoid touching the playback surface.
3. Zawartość opakowania
Sprawdź, czy w opakowaniu znajdują się wszystkie elementy wymienione poniżej:
- JVC XVN330B DVD Video Player
- Pilot (z bateriami)
- Kabel A/V (kompozytowy)
- Instrukcja obsługi (ta instrukcja)
4. Koniec produktuview
The JVC XVN330B DVD Video Player features a slim design and a black finish.
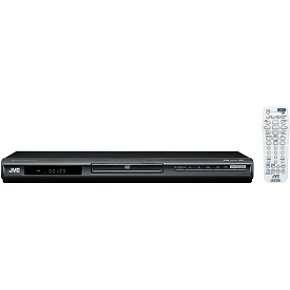
Rysunek 4.1: Przód view of the JVC XVN330B DVD Video Player. This image shows the compact, black chassis with the disc tray, power button, and basic playback controls on the front panel.
4.1 Elementy sterujące na panelu przednim
- Przycisk zasilania: Włącza lub wyłącza odtwarzacz.
- Taca na płytę: Do wkładania płyt DVD i CD.
- Przycisk Otwórz/Zamknij: Otwiera i zamyka tackę na płyty.
- Przycisk Odtwórz/Pauza: Rozpoczyna lub wstrzymuje odtwarzanie.
- Przycisk stopu: Zatrzymuje odtwarzanie.
- Skip Buttons (Forward/Backward): Skips tracks or chapters.
- Wyświetlacz: Wyświetla informacje o odtwarzaniu.
4.2 Połączenia panelu tylnego
- Wyjście wideo komponentowe (Y, Pb, Pr): For high-quality video connection to compatible TVs.
- Wyjście S-Video: For improved video quality over composite.
- Wyjście wideo kompozytowe (żółte RCA): Standardowe połączenie wideo.
- Wyjście audio analogowe (czerwony/biały RCA): For stereo audio connection.
- Wyjście cyfrowe audio koncentryczne: For digital audio connection to a receiver or ampliyfikator.
- Wejście zasilania prądem zmiennym: Podłącza się do przewodu zasilającego.
4.3 Pilot zdalnego sterowania
The included remote control provides full functionality for operating the DVD player from a distance. It includes buttons for power, disc tray open/close, playback controls (play, pause, stop, fast forward, rewind, skip), menu navigation, volume, and special features. Ensure batteries are correctly inserted.
5. Konfiguracja
5.1 Podłączanie do telewizora
Choose one of the following connection methods based on your television's available inputs for the best possible picture quality.
- Połączenie wideo komponentowe (najlepsza jakość):
Connect the Component Video Output (Y, Pb, Pr) jacks on the DVD player to the corresponding Component Video Input jacks on your TV using a component video cable (not included). Ensure colors (green, blue, red) match.
- Połączenie S-Video (lepsza jakość):
Connect the S-Video Output jack on the DVD player to the S-Video Input jack on your TV using an S-Video cable (not included).
- Połączenie wideo kompozytowe (jakość standardowa):
Connect the Composite Video Output (yellow RCA) jack on the DVD player to the Video Input (yellow RCA) jack on your TV using the supplied A/V cable.
5.2 Podłączanie dźwięku
Connect the audio outputs from the DVD player to your TV or an audio receiver/ampliyfikator.
- Połączenie audio analogowe:
Connect the Analog Audio Output (red and white RCA) jacks on the DVD player to the corresponding Audio Input jacks on your TV or audio receiver using the supplied A/V cable (for stereo sound).
- Coaxial Digital Audio Connection:
For multi-channel surround sound, connect the Coaxial Digital Audio Output jack on the DVD player to a Coaxial Digital Audio Input on your compatible audio receiver/amplifier using a coaxial digital audio cable (not included).
5.3 Połączenie zasilania
After all video and audio connections are made, plug the AC power cord into the AC power input on the rear of the DVD player, then plug the other end into a wall outlet.
6. Instrukcja obsługi
6.1 Podstawowe odtwarzanie płyt
- Naciśnij MOC przycisk, aby włączyć odtwarzacz.
- Naciśnij OTWÓRZ/ZAMKNIJ przycisk, aby otworzyć tacę na płytę.
- Umieść płytę DVD lub CD na tacy na płyty etykietą do góry.
- Naciśnij OTWÓRZ/ZAMKNIJ button again to close the disc tray. The player will automatically begin playback or display the disc menu.
- Użyj przycisków nawigacyjnych pilota i WCHODZIĆ to select options from the disc menu.
- Podczas odtwarzania użyj ODTWÓRZ/PAUZA, ZATRZYMYWAĆ SIĘ, SZYBKO PRZEWIJAJ, PRZEWIJAĆ, I POMINĄĆ przyciski według potrzeb.
6.2 Playing MP3/JPEG Discs
When an MP3 or JPEG disc is inserted, a menu displaying the files and folders will appear.
- Use the navigation buttons on the remote to select the desired file lub folderu.
- Naciskać WCHODZIĆ to open a folder or start playback of a selected file.
- For JPEG slideshows, you can select from 11 visual effects and save an image as a custom startup screen.
6.3 Funkcje specjalne
- Skanowanie progresywne: Provides a smoother, flicker-free picture when connected via component video to a compatible display. Ensure your TV is set to progressive scan mode if applicable.
- PAL Playback on NTSC TV: This player supports playback of PAL-formatted DVDs on NTSC televisions.
- Video Fine Processor: Offers 7 parameters, 2 presets, and 2 manual settings to adjust video output for personalized viewing. Access this feature through the player's setup menu.
- 10-Disc Memory: Allows you to bookmark a specific scene on up to 10 different discs, enabling easy return to that point later.
- Express Play Start: Reduces the time it takes for a disc to begin playing after insertion.
- Track Adjust: Helps ensure noise-free playback of burned discs.
7. Konserwacja
7.1 Czyszczenie urządzenia
- Wytrzyj zewnętrzną część urządzenia miękką, suchą ściereczką.
- Nie należy używać środków czyszczących o działaniu ściernym, wosków ani rozpuszczalników, gdyż mogą one uszkodzić powłokę.
- Przed czyszczeniem upewnij się, że urządzenie jest odłączone od prądu.
7.2 Pielęgnacja dysków
- Trzymaj płyty za krawędzie, aby uniknąć pozostawienia odcisków palców na powierzchni, na której się odtwarzają.
- Wyczyść płyty miękką, niepozostawiającą włókien ściereczką, delikatnie przecierając je od środka na zewnątrz.
- Nie należy używać rozpuszczalników ani środków czyszczących o właściwościach ściernych do czyszczenia płyt.
- Przechowuj płyty w oryginalnych pudełkach, aby uchronić je przed kurzem i zarysowaniami.
8. Rozwiązywanie Problemów
If you experience problems with your DVD player, refer to the following table for possible solutions.
| Problem | Możliwa przyczyna | Rozwiązanie |
|---|---|---|
| Brak zasilania | Przewód zasilający nie jest prawidłowo podłączony. | Ensure the power cord is firmly plugged into the player and the wall outlet. |
| Brak zdjęcia | Nieprawidłowe połączenie wideo lub wejście TV. | Check video cables are securely connected. Select the correct input source on your TV. |
| Brak dźwięku | Nieprawidłowe połączenie audio lub nieprawidłowa głośność telewizora/odbiornika. | Check audio cables. Increase volume on TV/receiver. Ensure correct audio input is selected. |
| Disc does not play / Freezes | Płyta jest brudna, porysowana lub jej format jest niezgodny. | Clean the disc. Try a different disc. Ensure the disc format is supported (DVD, CD, MP3, JPEG). |
| Pilot nie działa | Batteries are dead or incorrectly inserted. Obstruction between remote and player. | Wymień baterie. Upewnij się, że czujnik pilota odtwarzacza jest w zasięgu wzroku. |
| Disc tray vibrates | Normal operation for some units, or disc not seated properly. | Ensure the disc is centered in the tray. This can sometimes be a characteristic of the unit's build. |
9. Specyfikacje
| Funkcja | Opis |
|---|---|
| Nazwa modelu | XVN330B |
| Marka | JVC |
| Typ nośnika | DVD, CD, DVD-R/RW, DVD+R/RW, CD-R/RW, VCD/SVCD, MP3, JPEG |
| Cechy specjalne | Progressive Scan, Digital Still (JPEG) Slideshow with Music, PAL playback on NTSC TV, Video Fine Processor, 10-Disc Memory, Express Play Start, Track Adjust |
| Konwerter cyfrowo-analogowy wideo | 10-bit/54 MHz |
| Konwerter cyfrowo-analogowy audio | 192 kHz/24 bity |
| Wyjście wideo | Component Video (Y, Pb, Pr), S-Video, Composite Video (RCA) |
| Wyjście audio | Analog Stereo (RCA), Coaxial Digital Audio |
| Obsługiwany format audio | Dolby Digital (AC-3) |
| Kolor | Czarny |
| Waga przedmiotu | 5 funta (ok. 2.27 kg) |
| UPC | 046838026287 |
10. Gwarancja i wsparcie
JVC products are manufactured to high-quality standards and are backed by a limited warranty. For specific warranty terms and conditions, please refer to the warranty card included with your product or visit the official JVC webstrona.
For technical assistance, customer service, or to inquire about repairs, please contact JVC customer support through their official channels. Contact information can typically be found on the JVC webna stronie internetowej lub w dokumentacji dołączonej do zakupu.
Wsparcie online: www.jvc.com/support (This is a placeholder link, please refer to actual JVC support page)