
Wstęp
This manual provides essential instructions for the installation, operation, maintenance, and troubleshooting of the IBM 49P1599 FRU System Board. This system board is designed for personal computers, featuring a 400/533 Front Side Bus, integrated 10/100 Ethernet, and support for DDR2 memory.
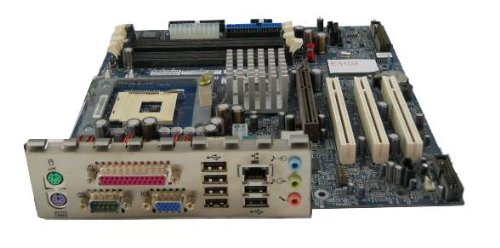
Image: The IBM 49P1599 FRU System Board. This image displays the main components and layout of the motherboard, including CPU socket, memory slots, and various connectors.
Konfiguracja i instalacja
Careful installation is crucial for the proper functioning of your system board. Always handle the board by its edges to avoid static discharge.
1. Przygotowanie do instalacji
- Ensure your computer case is compatible with the system board's form factor.
- Zbierz niezbędne narzędzia: śrubokręt krzyżakowy, opaskę antystatyczną na nadgarstek.
- Unplug the power supply from the wall outlet before beginning.
2. Installing the System Board
- Zainstaluj osłonę I/O w tylnym otworze obudowy komputera.
- Carefully align the system board with the standoffs in the case.
- Secure the system board with screws, ensuring it is firmly seated.
3. Instalowanie komponentów
Procesor (CPU)
This system board is supplied without a processor. Refer to your CPU's manual for specific installation instructions. Ensure the CPU is correctly oriented in the socket before securing the retention lever.
Pamięć (RAM)
The board supports DDR2 RAM and has 2 memory slots.
- Otwórz zatrzaski na obu końcach gniazda pamięci.
- Dopasuj moduł pamięci do gniazda, upewniając się, że wycięcie na module pokrywa się z wypustką w gnieździe.
- Naciśnij mocno oba końce modułu, aż klipsy wskoczą na swoje miejsce.
Karta graficzna
The system board features an Integrated Graphics Card Interface and a PCI-Express x16 slot for dedicated graphics cards.
- Locate the PCI-Express x16 slot.
- Zdejmij z obudowy odpowiednią osłonę gniazda rozszerzeń.
- Insert the graphics card firmly into the slot until it clicks. Secure it with a screw to the case.
4. Podłączanie kabli
- Złącza zasilania: Connect the main 24-pin ATX power connector and the 4-pin CPU power connector from your power supply to the system board.
- Urządzenia SATA: Connect SATA 3 data cables from your storage devices (hard drives, SSDs) to the SATA ports on the system board.
- Złącza na panelu przednim: Connect the power button, reset button, HDD LED, power LED, and USB ports from your case to the corresponding headers on the system board. Refer to the board's silkscreen labels for correct orientation.
- Ethernet: The board has integrated 10/100 Ethernet. Connect your network cable to the RJ-45 port on the I/O panel.
Instrukcja obsługi
After completing the physical installation, you can proceed with the initial boot and operating system setup.
1. Początkowy rozruch
- Upewnij się, że wszystkie komponenty są bezpiecznie podłączone.
- Podłącz monitor, klawiaturę i mysz.
- Plug in the power supply and turn on the system.
- System powinien się uruchomić, a na monitorze powinien pojawić się komunikat.
2. Konfiguracja BIOS/UEFI
During the initial boot sequence, press the designated key (commonly DEL, F2, F10, or F12) to enter the BIOS/UEFI setup utility. Here you can configure boot order, system time, and other hardware settings. Save changes before exiting.
3. Instalacja systemu operacyjnego
This system board is compatible with platforms such as Windows 10. Insert your operating system installation media (USB drive or DVD) and follow the on-screen prompts to install the operating system. Ensure all necessary drivers for the system board components are installed after the OS installation.
Konserwacja
Regular maintenance helps ensure the longevity and stable performance of your system board.
- Czyszczenie: Periodically clean dust from the system board and components using compressed air. Ensure the system is powered off and unplugged before cleaning.
- Aktualizacje BIOS-u: Check the official IBM support website for BIOS updates. BIOS updates can improve compatibility, stability, and performance. Follow the provided instructions carefully when updating the BIOS.
- Sprawdzanie komponentów: Ensure all cables and components remain securely connected.
Rozwiązywanie problemów
Jeśli napotkasz problemy, zapoznaj się z poniższymi typowymi krokami rozwiązywania problemów:
Brak zasilania
- Verify the power supply is connected to the wall outlet and turned on.
- Check that the 24-pin and 4-pin power connectors are securely attached to the system board.
- Ensure the front panel power button cable is correctly connected to the system board header.
Brak wyświetlacza
- Confirm the monitor is powered on and connected to the correct video output (either integrated or dedicated graphics card).
- Ponownie zamontuj kartę graficzną (jeśli dotyczy) i moduły pamięci.
- Jeżeli to możliwe, przetestuj urządzenie przy użyciu innego monitora lub kabla wideo.
System Fails to Boot
- Sprawdź, czy nie ma luźnych kabli lub podzespołów.
- Ensure the CPU is properly seated and its cooler is installed correctly.
- Try booting with only one memory module installed, rotating through the modules and slots to identify a faulty one.
- Reset the BIOS to default settings (refer to your system board's specific instructions for clearing CMOS).
Specyfikacje
Gwarancja i wsparcie
For warranty information and technical support, please refer to the official IBM website or contact your point of purchase. Keep your proof of purchase for warranty claims. IBM provides resources and support for its products to ensure customer satisfaction.
Aby uzyskać dalszą pomoc, odwiedź stronę Wsparcie IBM webstrona.
Powiązane dokumenty49P1599 FRU


Ask a question about this manual
Ask about setup, troubleshooting, compatibility, parts, safety, or missing instructions. Manuals+ will review the question and use this page’s manual context to help answer it.
Posting as .
After a successful submission, we securely hash the supplied account or form email before sending it to Microsoft Advertising for conversion attribution. Privacy details.
| Funkcja | Specyfikacja |
|---|---|
| Numer modelu | 49P1599 FRU |
| Magistrala FSB (Front Side Bus) | 400/533MHz |
| Technologia pamięci RAM | DDR2 |
| Prędkość zegara pamięci | 2133MHz |
| Dostępne gniazda pamięci | 2 |
| Interfejs karty graficznej | Integrated, PCI-Express x16 |
| Obsługiwany standard magistrali systemowej | SATA 3 |
| Integrated Ethernet | 10/100 Mb/s |
| Kompatybilne urządzenia | Komputer osobisty |
| Zgodność platformy | Windows 10 |
| Waga przedmiotu | 8 funta |