Wstęp
The Dualit Classic Toaster combines simplicity and sophistication, offering a timeless design with modern functionality. Engineered and hand-assembled in the UK, this toaster is built for durability and performance. It features extra-wide slots to accommodate various bread types, including a convenient bagel function. The unique ejector system ensures your toast stays warm until you are ready to retrieve it. With its robust construction and user-friendly controls, the Dualit Classic Toaster is designed to provide perfectly browned toast every time.

Image: The Dualit Classic 2 Slice NewGen Toaster, showcasing its sleek metallic charcoal finish and two slots with toasted bread.
Ważne informacje dotyczące bezpieczeństwa
- Zawsze należy upewnić się, że toster jest umieszczony na stabilnej, odpornej na ciepło powierzchni, z dala od materiałów łatwopalnych.
- Do not operate the toaster without the crumb tray correctly inserted.
- Odłącz toster od gniazdka elektrycznego, gdy nie jest używany oraz przed czyszczeniem.
- Nigdy nie wkładaj metalowych przedmiotów do otworów tostera.
- Supervise children closely when the toaster is in use.
- Nie zanurzaj tostera, przewodu ani wtyczki w wodzie lub innym płynie.
Organizować coś
- Carefully unpack the toaster and remove all packaging materials.
- Place the toaster on a clean, dry, and stable countertop or table. Ensure there is adequate clearance around the toaster for ventilation.
- Verify that the removable crumb tray is fully inserted at the bottom of the toaster.
- Podłącz przewód zasilający do uziemionego gniazdka elektrycznego.

Image: A detailed diagram highlighting the key components of the Dualit toaster, including the removable crumb tray and manual ejector.
Instrukcja obsługi
Podstawowe opiekanie
- Insert your desired bread slices into the extra-wide 28mm slots.
- Use the top selector switch to activate the desired number of slots (e.g., 1 or 2 slices).
- Adjust the mechanical timer dial (bottom dial) to your preferred browning level. Settings range from light to dark.
- Press the manual ejector lever down to initiate the toasting cycle. The elements will begin to glow.
- To check the toast's progress without interrupting the cycle, gently lift the ejector lever. The toast will remain warm until the lever is fully pushed up to eject.

Obraz: Zbliżenie view of the toaster's mechanical controls, including the energy-efficient slot selector and the browning control dial.
Funkcja rozmrażania
For frozen bread, use the defrost setting (indicated by a snowflake icon) on the mechanical timer dial. This function will gently thaw the bread before beginning the toasting process, ensuring even results.
Funkcja bajgla
The toaster features a bagel function that toasts the cut side of the bagel while gently warming the outer side. Place the bagel with the cut side facing the active heating elements for optimal results.
Wideo: Oficjalnyview of the Dualit Classic NewGen Toaster, demonstrating its features and operation.
Video: A look into the manufacturing process of the Dualit Classic Toaster, highlighting its hand-built quality.
Konserwacja i czyszczenie
- Przed czyszczeniem zawsze odłączaj toster od zasilania i pozwól mu całkowicie ostygnąć.
- Tacka na okruchy: Regularly remove and empty the crumb tray. Wipe it clean with a damp cloth and ensure it is dry before reinserting.
- Zewnętrzny: Przetrzyj zewnętrzną część tostera miękką szmatką.amp ściereczką. Nie używaj środków czyszczących o działaniu ściernym, gąbek ściernych ani silnych środków chemicznych, ponieważ mogą one uszkodzić wykończenie.
- Elementy ProHeat: The patented ProHeat elements are designed for durability and longevity. In the unlikely event of an element needing replacement, this can be done by a qualified electrician, ensuring the toaster's long lifespan.

Image: A hand holding a Dualit ProHeat element, emphasizing the toaster's repairable design and long-lasting components.

Image: The removable crumb tray being pulled out from the bottom of the Dualit toaster, illustrating ease of cleaning.
Rozwiązywanie problemów
| Problem | Możliwa przyczyna | Rozwiązanie |
|---|---|---|
| Toaster not turning on | Nieprawidłowo podłączony; problem z gniazdkiem elektrycznym. | Ensure the toaster is securely plugged into a working power outlet. Check the circuit breaker if necessary. |
| Nierówne opiekanie | Incorrect slice selection; first use on a cold toaster. | Confirm the correct number of slots are selected. For the first use of the day, a slightly higher browning setting or a brief preheat may be needed. |
| Bread stuck in slots | Bread too thick or small pieces. | Use the manual ejector lever to lift the toast. Do not use metal utensils. For smaller items, consider using a Dualit sandwich cage (sold separately). |
| Zapach dymu lub spalenizny | Crumbs accumulated in the tray or inside the toaster. | Unplug immediately. Allow to cool, then remove and clean the crumb tray. Gently shake out any remaining crumbs from the toaster. |
Specyfikacje
- Marka: Podwójny
- Numer modelu: 27154
- Kolor: Metallic Charcoal
- Tworzywo: Stal nierdzewna
- Wymiary produktu: 8.6" gł. x 10.2" szer. x 8.2" wys.
- Cotage: 1250 watów
- Liczba plasterków: 2
- Dodatek specjalny: Fully Repairable
- Waga przedmiotu: 7 funtów
- Tomtage: 120 V
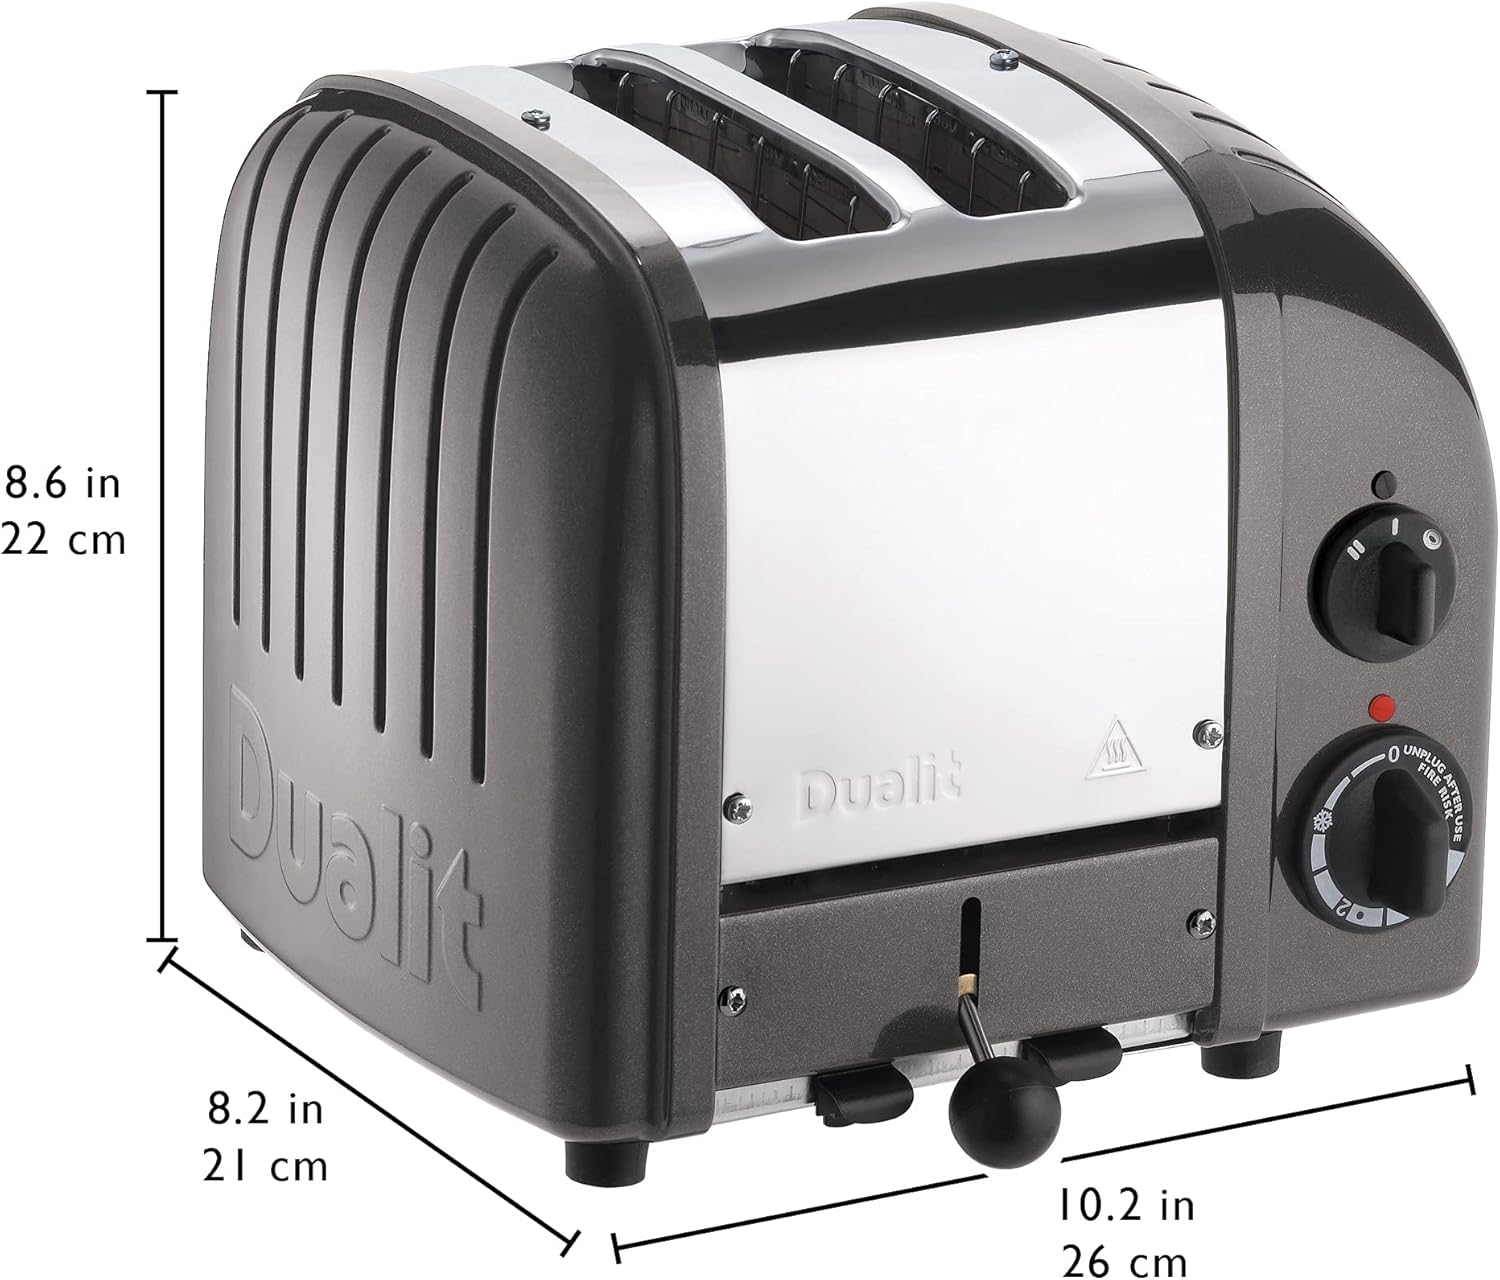
Image: The Dualit toaster with its key dimensions (depth, width, height) clearly marked for reference.
Gwarancja i wsparcie
The Dualit Classic 2 Slice NewGen Toaster typically comes with a one-year warranty from the manufacturer. For specific warranty details, product registration, or technical support, please refer to the official user manual or contact Dualit customer service.
Oficjalna instrukcja obsługi (PDF): Pobierz tutaj
Visit the Dualit Store: Dualit Store on Amazon