
1. Wprowadzenie
Dziękujemy za zakupasing the Panasonic KP150BK Vertical Electric Pencil Sharpener. This sharpener is designed for efficient and precise sharpening of standard pencils, featuring a space-saving vertical design and an automatic stop function to prevent over-sharpening. Please read this manual thoroughly before use to ensure proper operation and maintenance.
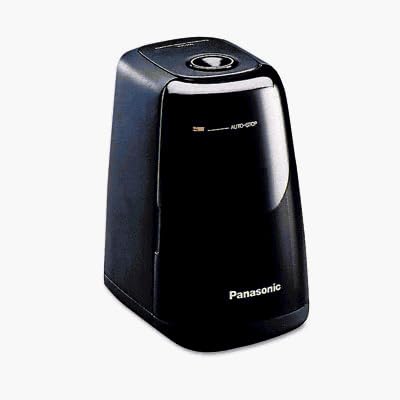
Image: The Panasonic KP150BK Vertical Electric Pencil Sharpener in black, demonstrating its compact vertical design.
2. Ważne informacje dotyczące bezpieczeństwa
- Always ensure the sharpener is placed on a stable, flat surface during use.
- Do not insert fingers or foreign objects into the sharpening opening.
- Unplug the sharpener from the power outlet before cleaning or emptying the shaving receptacle.
- Aby uniknąć porażenia prądem, trzymaj ostrzałkę z dala od wody i innych płynów.
- Urządzenie to nie jest przeznaczone do użytku przez osoby (w tym dzieci) o ograniczonej sprawności fizycznej, sensorycznej lub umysłowej, a także osoby nieposiadające odpowiedniego doświadczenia lub wiedzy, chyba że znajdują się one pod nadzorem osoby odpowiedzialnej za ich bezpieczeństwo lub otrzymały od niej instrukcje dotyczące korzystania z urządzenia.
- Do not attempt to sharpen crayons, chalk, or soft-lead pencils, as this may clog the blade and damage the sharpener.
3. Funkcje produktu
- Projekt pionowy: Space-saving footprint for efficient desk organization.
- Hardened Steel Cutter Blade: Designed for durability and consistent sharpening.
- Auto-Stop™ Function: Automatically stops sharpening when a perfect 16-degree point is achieved, preventing pencil waste.
- Wskaźnik czerwonego światła: Signals when the pencil is sharpened to the optimal point.
- Semi-Transparent Shaving Receptacle: Allows easy monitoring of shaving levels.
- Przełącznik bezpieczeństwa: Prevents operation when the shaving receptacle is removed.
- Heavy Duty Motor: Provides reliable performance for frequent use.
4. Konfiguracja
- Rozpakować: Carefully remove the sharpener from its packaging.
- Umieszczenie: Place the sharpener on a stable, flat, and dry surface, such as a desk or table. Ensure there is enough space around the unit for proper ventilation.
- Podłączenie zasilania: Podłącz przewód zasilający do standardowego gniazdka elektrycznego.
5. Instrukcja obsługi
- Włóż ołówek: Hold the pencil firmly and insert it straight into the sharpening opening at the top of the unit.
- Wyostrzyć: Gently push the pencil down into the opening. The motor will start automatically. Apply light, consistent pressure.
- Auto-Stop Indication: Continue to hold the pencil in place until the red light indicator illuminates and the motor stops automatically. This indicates that the pencil has reached a perfect point.
- Usuń ołówek: Carefully remove the sharpened pencil from the opening.
Notatka: If the motor does not start, ensure the shaving receptacle is correctly seated and the unit is plugged in. Avoid excessive force when inserting the pencil.
6. Konserwacja
Emptying the Shaving Receptacle
- Wyjąć wtyczkę: Always unplug the sharpener from the power outlet before emptying the receptacle.
- Remove Receptacle: Gently pull the semi-transparent shaving receptacle away from the main unit. The safety switch will prevent the motor from operating while it is removed.
- Puste wióry: Dispose of the pencil shavings into a waste bin.
- Czysty: If necessary, wipe the receptacle with a dry cloth. Do not wash with water.
- Podłącz ponownie: Carefully slide the shaving receptacle back into its position until it clicks securely into place. Ensure it is properly seated for the sharpener to operate.
Ostrożność: Do not operate the sharpener without the shaving receptacle securely in place.
7. Rozwiązywanie Problemów
| Problem | Możliwa przyczyna | Rozwiązanie |
|---|---|---|
| Temperówka się nie włącza. | 1. Niepodłączony. 2. Shaving receptacle not properly seated. 3. Moctage. | 1. Upewnij się, że przewód zasilający jest prawidłowo podłączony do działającego gniazdka. 2. Re-seat the shaving receptacle until it clicks into place. 3. Check other electrical devices to confirm power supply. |
| Pencil does not sharpen or sharpens unevenly. | 1. Dull cutter blade. 2. Pencil lead broken inside. 3. Shavings clogging the blade. 4. Incorrect pencil type (e.g., soft lead, crayon). | 1. The steel cutting wheel is designed for long life; if dull, contact support. 2. Gently tap the sharpener to dislodge broken lead. If persistent, carefully remove the receptacle and inspect. 3. Empty the shaving receptacle and ensure no blockages. 4. Use only standard graphite pencils. |
| Motor stops prematurely or runs intermittently. | 1. Overheating (due to continuous use). 2. Sensor sensitivity. | 1. Allow the sharpener to cool down for several minutes before resuming use. 2. Ensure the pencil is inserted straight and with consistent, light pressure. |
8. Specyfikacje
| Funkcja | Szczegół |
|---|---|
| Marka | Panasonic |
| Numer modelu | KP150BK |
| Kolor | Czarny |
| Źródło zasilania | Elektryczny |
| Tworzywo | Stal stopowa |
| Cechy specjalne | Heavy Duty, Transparent Shaving Receptacle |
| Waga przedmiotu | 0.06 funtów |
| Liczba jednostek | 1.0 Liczba |
9. Gwarancja i wsparcie
This Panasonic KP150BK Vertical Electric Pencil Sharpener comes with a manufacturer's limited one-year warranty. For warranty claims, technical support, or service inquiries, please refer to the contact information provided with your purchase documentation or visit the official Panasonic webstrona.
Prosimy zachować dowód zakupu w celach gwarancyjnych.