
Wstęp
Dziękujemy za zakupasing the Sharp XL-70-H Compact Stereo System. This manual provides essential information for the safe and efficient operation of your audio system. Please read it thoroughly before use and keep it for future reference.
Informacje dotyczące bezpieczeństwa
Aby zapewnić bezpieczną obsługę i zapobiec uszkodzeniom, należy przestrzegać następujących środków ostrożności:
- Aby uniknąć pożaru lub porażenia prądem, nie wystawiaj urządzenia na działanie deszczu i wilgoci.
- Nie blokuj otworów wentylacyjnych. Zapewnij odpowiednią ilość miejsca wokół urządzenia, aby zapewnić prawidłowy przepływ powietrza.
- Umieść urządzenie na stabilnej, równej powierzchni.
- Nie należy stawiać na urządzeniu przedmiotów wypełnionych płynami, np. wazonów.
- Odłącz urządzenie od gniazdka ściennego podczas burzy z piorunami lub jeśli nie będzie używane przez dłuższy czas.
- Wszelkie prace serwisowe należy powierzać wykwalifikowanemu personelowi.
Zawartość opakowania
Sprawdź, czy w opakowaniu znajdują się wszystkie elementy:
- Sharp XL-70-H Main Unit (Tower)
- Two 2-way MDF Speakers
- Przewód zasilający
- Remote Control (if included, not explicitly mentioned but common)
- Kable głośnikowe
Produkt ponadview
The Sharp XL-70-H is a compact stereo system designed for versatile audio playback. It features a CD player with a glass lid, a full logic cassette deck, and an auxiliary input for connecting external devices. The system includes two 2-way MDF speakers for clear sound reproduction.
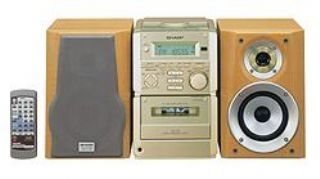
Rysunek 1: Przód view of the Sharp XL-70-H Compact Stereo System, showing the main unit and two speakers. The main unit features a central display, control buttons, and the CD tray.
Organizować coś
1. Połączenie głośnika
Connect the included 2-way MDF speakers to the main unit. Ensure that the positive (+) and negative (-) terminals on the speakers match the corresponding terminals on the main unit. Incorrect polarity can affect sound quality.
2. Podłączenie zasilania
Plug the AC power cord into the power input on the rear of the main unit, then plug the other end into a standard wall outlet (AC 230V, 50Hz).
3. Pierwsze włączenie zasilania
Press the Power button on the main unit or remote control to turn on the system. The display will illuminate.
Instrukcja obsługi
Obsługa odtwarzacza CD
- Naciśnij CD przycisk, aby wybrać funkcję CD.
- Naciśnij OTWÓRZ/ZAMKNIJ button. The glass lid will open via motor assistance.
- Place a CD (CD-DA format) with the label side up on the disc tray.
- Naciśnij OTWÓRZ/ZAMKNIJ button again to close the lid.
- Naciśnij ODTWÓRZ/PAUZA przycisk, aby rozpocząć odtwarzanie.
- Użyj POMINĄĆ przyciski do nawigacji pomiędzy utworami.
Obsługa odtwarzacza kasetowego
- Naciśnij TAŚMA button to select the cassette function.
- Naciśnij OTWÓRZ/WYSUŃ button to open the cassette deck.
- Włóż kasetę magnetofonową.
- Naciśnij GRAĆ przycisk, aby rozpocząć odtwarzanie.
- Użyj PRZEWIJAĆ I SZYBKO PRZEWIJAJ przyciski do nawigacji.
- Naciśnij ZATRZYMAJ/WYSUŃ przycisk, aby zatrzymać odtwarzanie i wysunąć taśmę.
Obsługa wejścia AUX
Connect an external audio device (e.g., smartphone, MP3 player) to the AUX input jack on the main unit using a 3.5mm audio cable. Press the AUX button to select the auxiliary input. Audio from the connected device will play through the system speakers.
Regulacja głośności i tonu
- Tom: Rotate the motorized SERVO VOLUME Aby dostosować poziom dźwięku, użyj pokrętła lub przycisków głośności na pilocie.
- Bas/Góra: Użyj dedykowanego BASS I POTROIĆ controls to adjust the low and high frequency response of the audio.
Clock, Timer, and Sleep Functions
The system includes a clock display, a timer function for scheduled operations, and a sleep function to automatically turn off the system after a set period. Refer to the on-screen menu and Multi Jog Control for setting these features.
Konserwacja
Czyszczenie urządzenia
Wipe the exterior of the unit with a soft, dry cloth. Do not use abrasive cleaners, waxes, or solvents as they may damage the finish. For stubborn stains, lightly dampen the cloth with water and mild detergent, then wipe dry.
Pielęgnacja odtwarzacza CD
Handle CDs by their edges to avoid fingerprints. If a CD is dirty, wipe it gently from the center outwards with a soft, lint-free cloth. Do not use solvents or abrasive cleaners on CDs.
Cassette Deck Care
Periodically clean the tape heads and pinch rollers using a specialized cassette head cleaning kit to ensure optimal sound quality and prevent tape damage.
Rozwiązywanie problemów
| Problem | Możliwa przyczyna | Rozwiązanie |
|---|---|---|
| Brak zasilania | Przewód zasilający nie jest podłączony; gniazdko elektryczne nie jest aktywne. | Ensure power cord is securely plugged in; Check the wall outlet with another device. |
| Brak dźwięku | Volume too low; Speakers not connected; Incorrect input selected. | Increase volume; Check speaker connections; Select the correct input source (CD, TAPE, AUX). |
| Płyta CD nie odtwarza się | Płyta CD włożona nieprawidłowo; płyta CD jest brudna lub porysowana; format płyty nie jest obsługiwany. | Insert CD with label side up; Clean or replace CD; Ensure CD is CD-DA format. |
| Kaseta magnetofonowa nie odtwarza się | Tape inserted incorrectly; Tape heads dirty. | Ensure tape is inserted correctly; Clean tape heads. |
Jeśli po wypróbowaniu tych rozwiązań problem nadal występuje, skontaktuj się z obsługą klienta.
Specyfikacje
- Model: XL-70-H
- Marka: Ostry
- Output Power (DIN 45324):
- Peak Music Power: 120W (Total)
- Music Power: 60W (30W + 30W)
- Sine Wave Power: 40W (20W + 20W)
- Wymiary (szer. x wys. x gł.):
- Main Unit (Tower): 160mm x 241mm x 298mm
- Speakers: 160mm x 240mm x 189mm
- Waga przedmiotu: 8 kilogramów
- Łączność: Pomocniczy
- Typ głośnika: 2-way MDF speaker system
- Źródło zasilania: AC-adapter (connected to a standard wall outlet)
- Zgodne urządzenia: Cassette player, AUX device
- Obsługiwany format audio: CD-DA
- Liczba głośników: 2
- Tryb wyjścia audio: Stereo (2.0 kanały)
- Kolor: Srebrny
- Obsługa Bluetooth: Tak
Gwarancja i wsparcie
This product comes with a standard manufacturer's warranty. For detailed warranty information, please refer to the warranty card included with your purchase or visit the official Sharp website. For technical support or service inquiries, please contact Sharp customer service.