Wstęp
The RCA CC9370 AutoShot Digital MiniDV Camcorder is designed for recording high-quality digital video and capturing still images. Featuring a 680,000-pixel CCD for clear resolution, a swiveling 3-inch color LCD monitor for flexible operation, and a 10x optical/250x digital zoom lens, this camcorder is equipped for various recording scenarios. Built-in image stabilization helps maintain steady footage. This manual provides essential information for setting up, operating, maintaining, and troubleshooting your camcorder.
Co jest w pudełku
Sprawdź, czy w opakowaniu znajdują się wszystkie elementy:
- RCA CC9370 AutoShot Digital MiniDV Camcorder
- Kabel USB
- Instrukcja obsługi (ten dokument)
Produkt ponadview

The RCA CC9370 camcorder shown with its 3-inch LCD screen open, displaying a vibrant image. This view highlights the camcorder's compact design and the flexibility of the swiveling screen.

Na bok view of the RCA CC9370 camcorder, illustrating the ergonomic hand strap for secure gripping and various control buttons for easy access during operation.
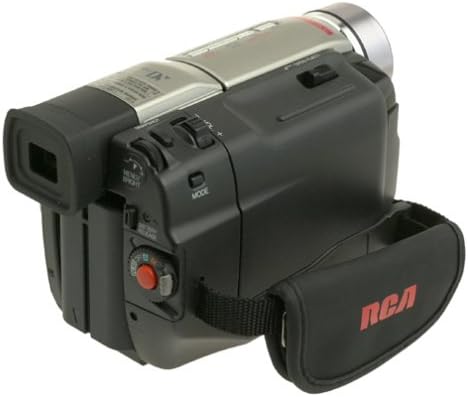
This image provides a top-down perspective of the camcorder, showcasing the lens barrel and the layout of the top-mounted controls, including zoom and recording buttons.
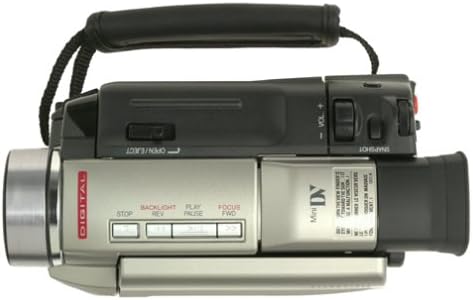
Przód-strona view of the RCA CC9370 camcorder, focusing on the lens assembly and the front panel design, which includes the microphone and other indicators.
Organizować coś
1. Instalacja baterii
- Upewnij się, że kamera jest wyłączona.
- Znajdź komorę baterii z tyłu kamery.
- Wsuń baterię do komory, aż zatrzaśnie się pewnie.
- Aby wyjąć baterię, naciśnij dźwignię zwalniającą baterię i wysuń ją.
2. MiniDV Tape Insertion
- Open the tape compartment door, typically located on the top or side of the camcorder.
- Insert a MiniDV cassette with the window facing outwards and the tape reel side oriented correctly.
- Gently push the cassette until it seats properly, then close the compartment door.
3. Pierwsze włączenie zasilania
- Connect the AC adapter or ensure the battery is charged.
- Set the POWER switch to the 'ON' or 'CAMERA' position.
- Open the LCD monitor or pull out the viewfinder to activate the display.
Obsługa kamery
Nagrywanie wideo
- Włączanie: Turn the camcorder on and select 'CAMERA' mode.
- Ramy: Use the 3-inch swiveling LCD monitor or viewwyszukiwarka, aby wykadrować ujęcie.
- Brzęczenie: Use the zoom lever to adjust between 10x optical and 250x digital zoom.
- Stabilizacja obrazu: The built-in image stabilization system helps reduce camera shake during recording.
- Rozpocznij/zatrzymaj nagrywanie: Press the RECORD button to begin and end recording.
Digital Still Camera Function
The camcorder can capture still images at 640 x 480 resolution. These images are stored directly onto the digital videotape. To transfer them to a PC, use the provided serial cable and compatible software.
Digital Effects and Scene Transitions
Enhance your recordings with various digital effects and scene transitions. Options may include classic film, strobe, slow shutter, and black and white. Refer to the on-screen menu for selection and application.
Odtwarzanie nagranego dźwięku
- Tryb odtwarzania: Switch the camcorder to 'VCR' or 'PLAY' mode.
- Sterownica: Use the PLAY, STOP, REWIND, and FAST FORWARD buttons to navigate your recordings.
- Powiększenie odtwarzania: Utilize the playback zoom feature for enhanced viewing nagranych footage.
- Random-Assemble Editing: This feature allows you to mark and recall up to eight favorite scenes for review or basic editing.
Connecting to a Computer or TV
Łączenie się z komputerem
- For Still Images: Use the provided serial cable to connect the camcorder to your PC. Install any necessary drivers or software for image transfer.
- Dla wideo: The camcorder includes an IEEE 1394 (FireWire) port and cable for digital video transfer to compatible computers and editing devices.
Podłączanie do telewizora
Connect the camcorder to a television using either standard analog AV connectors (RCA composite) or an S-video connector for video playback on a larger screen.
Konserwacja
- Czyszczenie obiektywu: Use a soft, lint-free cloth specifically designed for optical lenses to gently clean the camcorder lens. Avoid harsh chemicals.
- Czyszczenie ciała: Przetrzyj obudowę kamery miękką, suchą ściereczką. Nie używaj rozpuszczalników ani środków czyszczących o właściwościach ściernych.
- Pielęgnacja baterii: Store batteries in a cool, dry place. Fully charge batteries before extended use and discharge them periodically if storing for long periods.
- Przechowywanie taśm: Store MiniDV tapes in their cases, away from direct sunlight, high temperatures, and strong magnetic fields.
- Przechowywanie ogólne: When not in use, store the camcorder in a protective bag or case to prevent dust and damage.
Rozwiązywanie problemów
| Problem | Możliwa przyczyna | Rozwiązanie |
|---|---|---|
| Kamera nie włącza się. | Battery is discharged or not inserted correctly. AC adapter not connected. | Charge the battery or ensure it is properly seated. Connect the AC adapter. |
| Brak obrazu na wyświetlaczu LCD/viewznalazca. | LCD/viewfinder not open or activated. Power saving mode. | Open the LCD or pull out the viewfinder. Check power saving settings. |
| Słaba jakość wideo. | Lens is dirty. Insufficient lighting. Image stabilization off. | Clean the lens. Record in better lighting conditions. Ensure image stabilization is active. |
| Cannot transfer still images to PC. | Incorrect cable connection. Missing drivers/software. | Ensure serial cable is securely connected. Install necessary drivers and software. |
Specyfikacje
| Funkcja | Szczegół |
|---|---|
| Marka | RCA |
| Numer modelu | CC9370 |
| Technologia czujnika fotograficznego | CCD |
| Rozdzielczość przechwytywania wideo | 480p |
| Rozdzielczość zdjęć | 640 x 480 (stored on videotape) |
| Rozmiar ekranu | 3 Inches (swiveling color LCD) |
| Zoom optyczny | 10x |
| Zoom cyfrowy | 250x |
| Stabilizacja obrazu | Cyfrowy |
| Technologia łączności | RCA (Analog AV), S-Video, IEEE 1394 (FireWire), Serial (for still images) |
| Średnia żywotność baterii | 1 godzina |
| Waga przedmiotu | 3.18 funtów |
| Kolor | Czarny, Srebrny |
Informacje o gwarancji
This RCA CC9370 AutoShot Digital MiniDV Camcorder comes with a warranty covering 1 year for parts and 90 days for labor from the date of purchase. Please retain your proof of purchase for warranty claims. This warranty covers manufacturing defects and does not cover damage caused by misuse, accidents, or unauthorized modifications.
Wsparcie
For further assistance, technical support, or warranty service, please refer to the contact information provided with your product packaging or visit the official RCA support website. Ensure you have your model number (CC9370) and proof of purchase available when contacting support.